1 · First login
The installer prints the web address and a generated password for the first root
operator on its final screen. Open http://<your-server>/ and sign in.
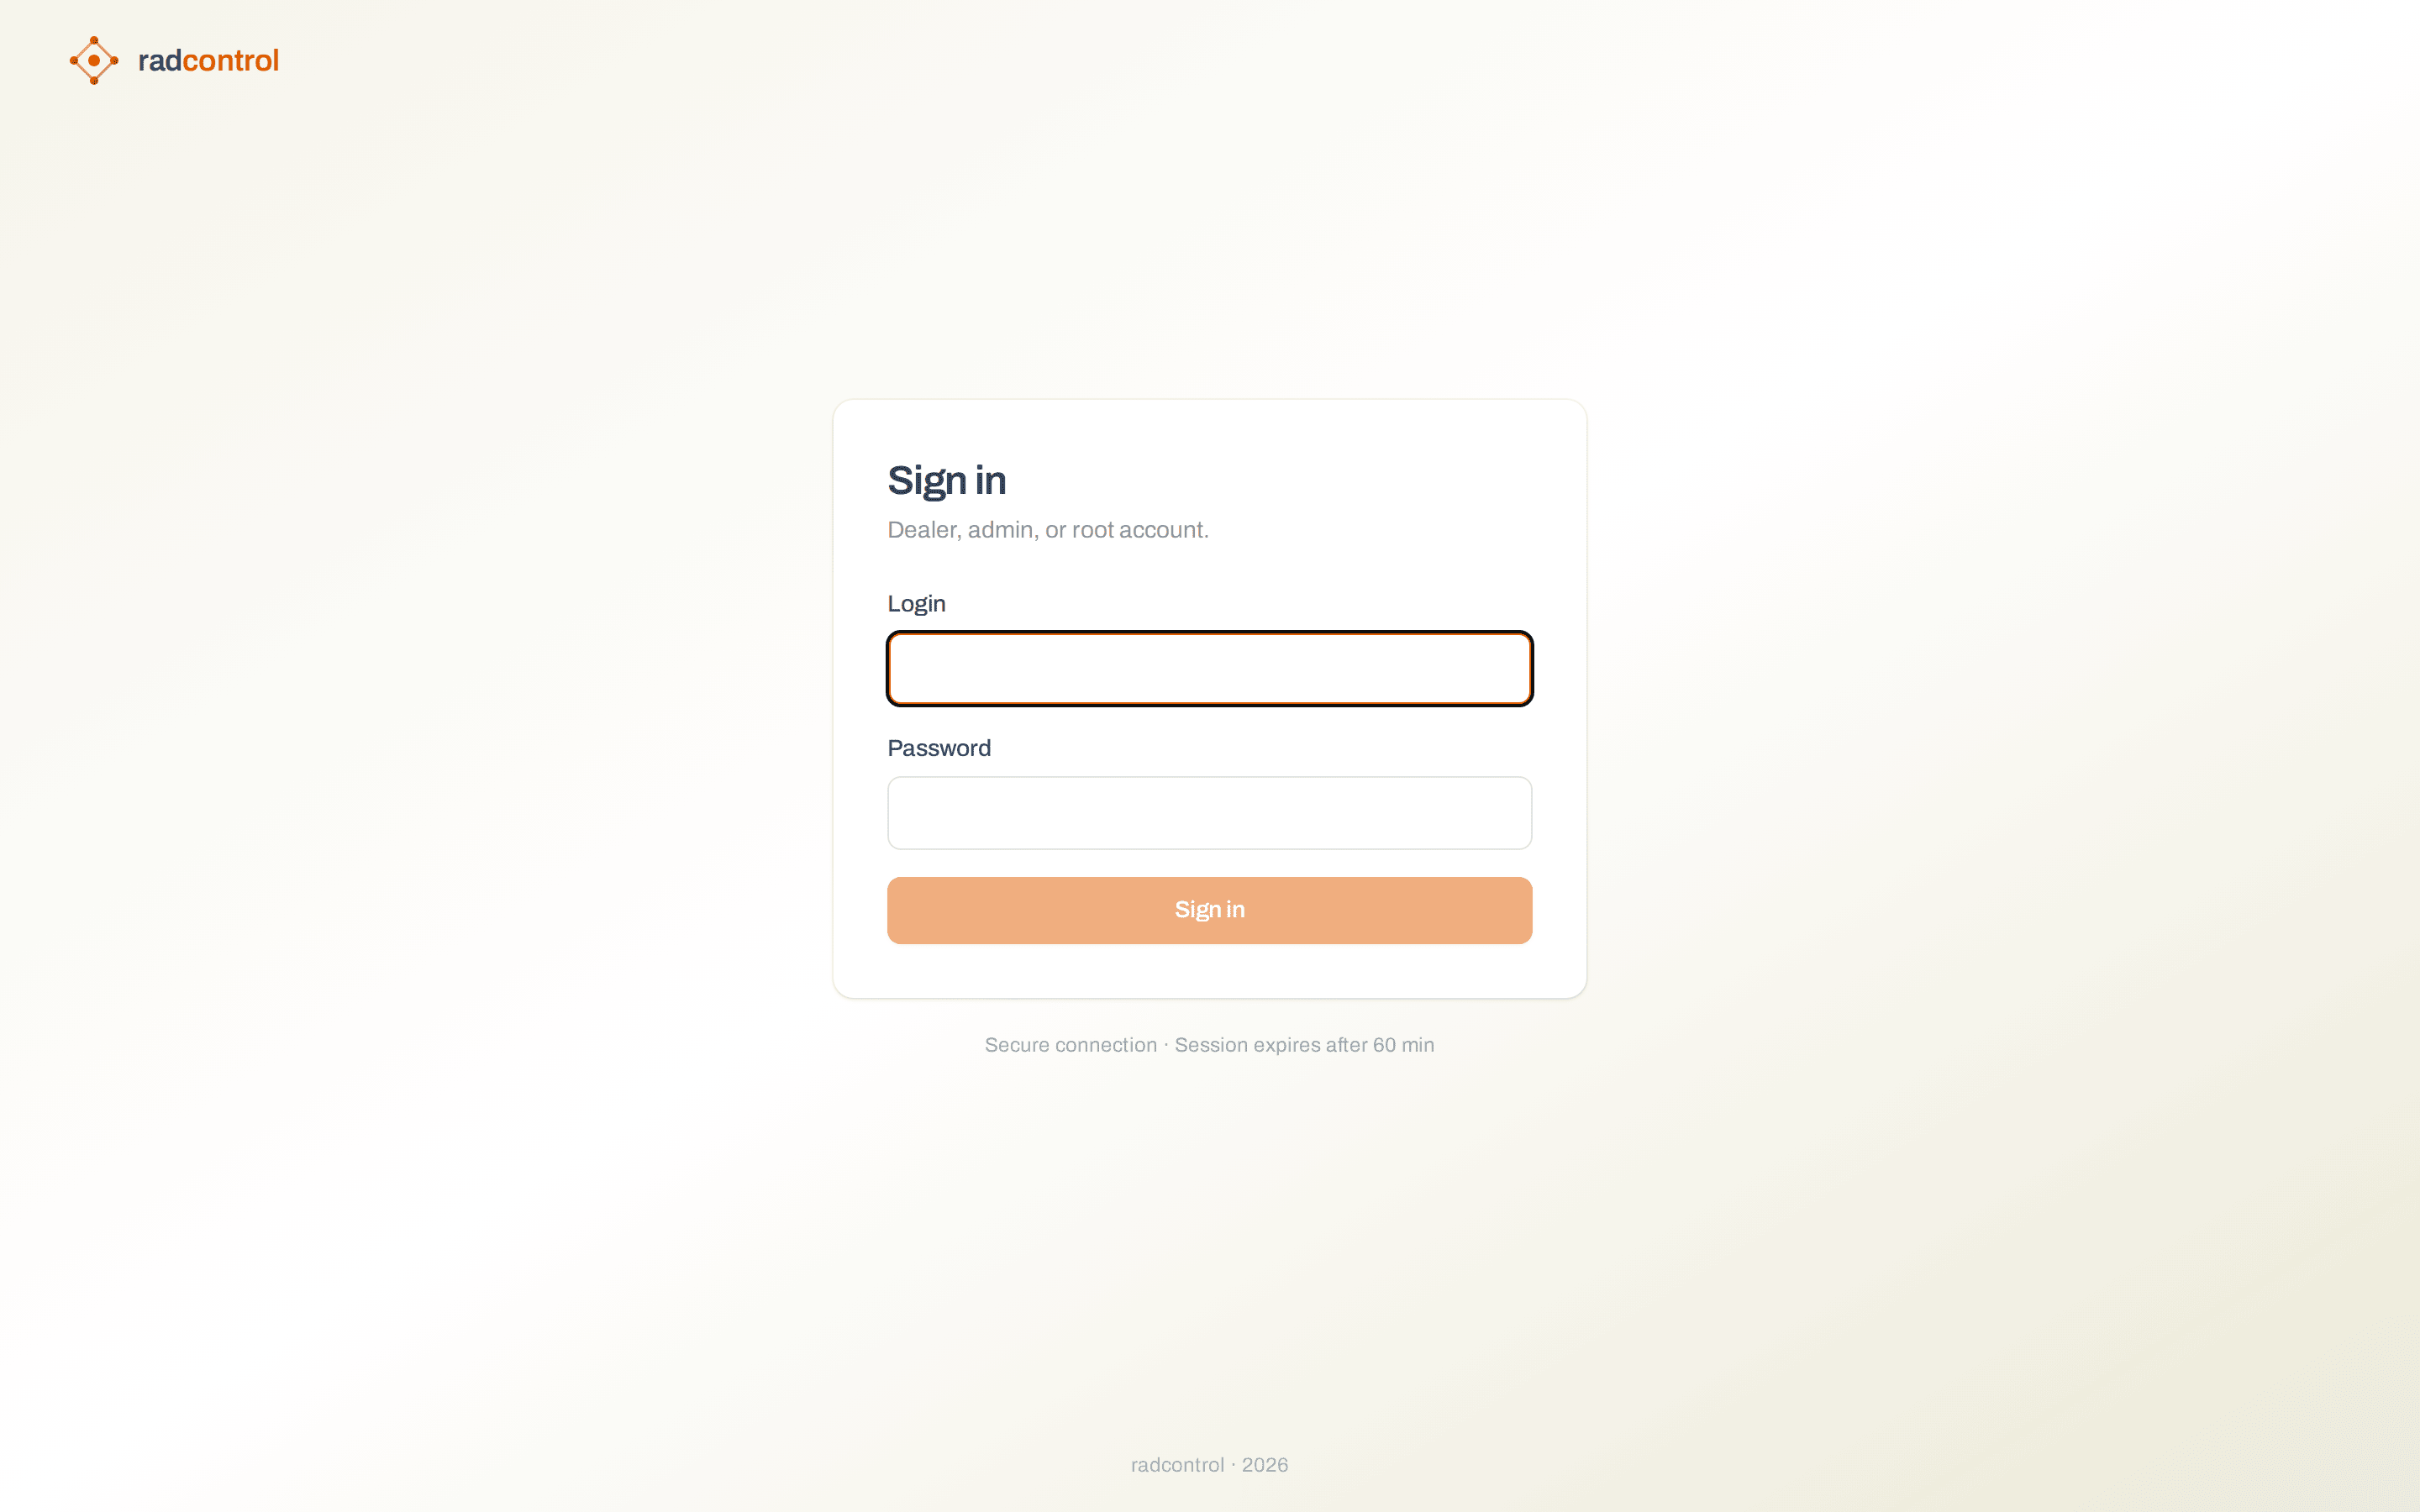
- Change the generated password right away: avatar menu → Change password.
- Enable two-factor auth under Account → Two-factor auth (TOTP, works with any authenticator app).
- Optional hardening: System → Password policy sets length/rotation rules for every operator.
2 · Add your router (NAS)
A NAS is any router or BNG that speaks RADIUS to radcontrol: MikroTik (RouterOS), accel-ppp / VyOS, Huawei ME60 / NetEngine, ZTE ZXR10, Cisco ASR (ISG), Netelastic vBNG, or Ericsson SmartEdge. Go to Manage → NAS devices → New NAS, enter its IP, a shortname and a shared secret, and pick the vendor — the form shows the attribute and CoA notes for that platform, and speed policy is emitted in its dialect automatically. Save. That's it — no restart: radcontrol recognizes new routers automatically, so the router is served on its first packet.
For a MikroTik, the router side looks like this:
> /radius add service=ppp address=<radcontrol-ip> secret=<shared-secret> timeout=800ms
> /radius incoming set accept=yes port=3799   # CoA — lets radcontrol change speeds mid-session
> /ppp aaa set use-radius=yes accounting=yes interim-update=5m
- The NAS list shows a seen by RADIUS badge once the first request arrives.
- Set the CoA port (default 3799) so cap crossings and night windows apply mid-session, not just at the next login.
- Open UDP 1812/1813 from the router to the server, and UDP 3799 in the other direction.
3 · Create an account type
Account types live in Manage → Account types. An account type is the
template dealers resell: price, period, speeds, and policy. The speed section compiles
everything into the rate-limit attributes each router's vendor expects —
Mikrotik-Rate-Limit on RouterOS, the native equivalent on the others.
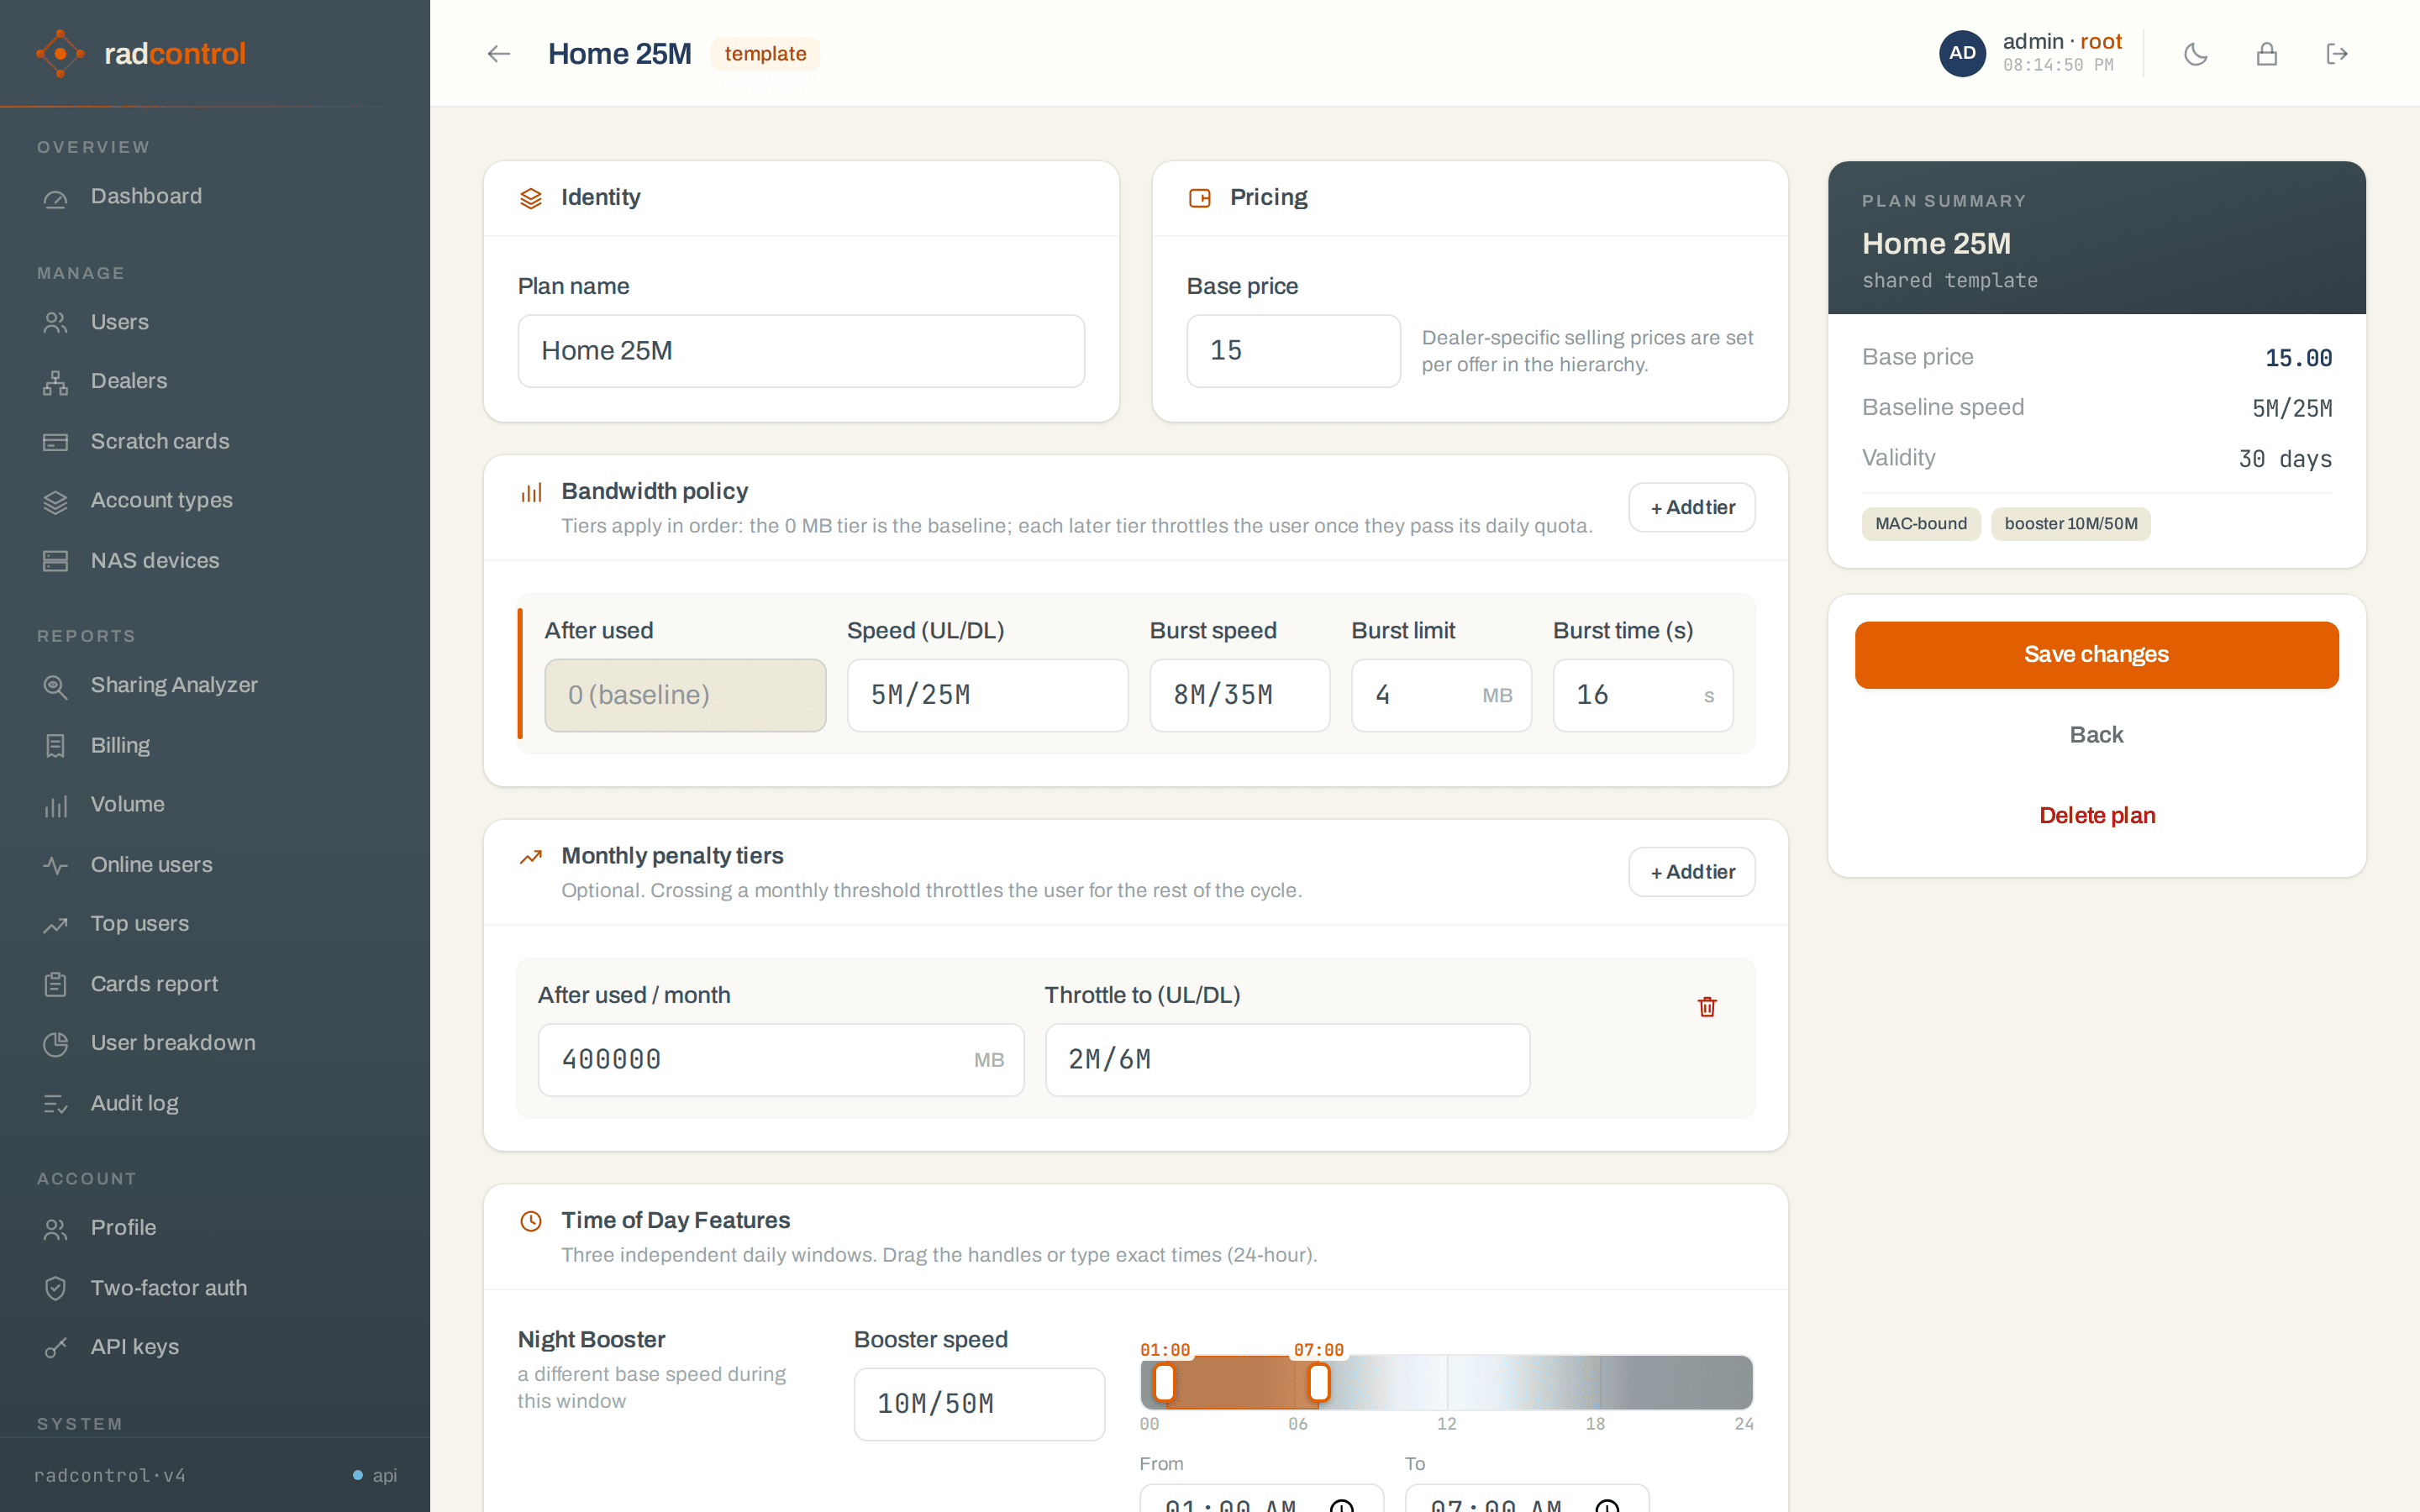
- Basic speed — the baseline, as
up/down(e.g.5M/25M). - Usage tiers — thresholds in MB that step the speed down as the period's quota is consumed; the last tier is the penalty speed.
- Burst — RouterOS burst triple (speed, threshold, time) for snappy page loads.
- Time windows — drag directly on the day/night track:
- Night Booster — a different base speed inside the window.
- No Speed Reduction — suppresses penalty speeds only.
- Free Quota Time Span — traffic in the window doesn't count against quota.
- Caps — daily / monthly volume caps, session limits, and the counter reset hour.
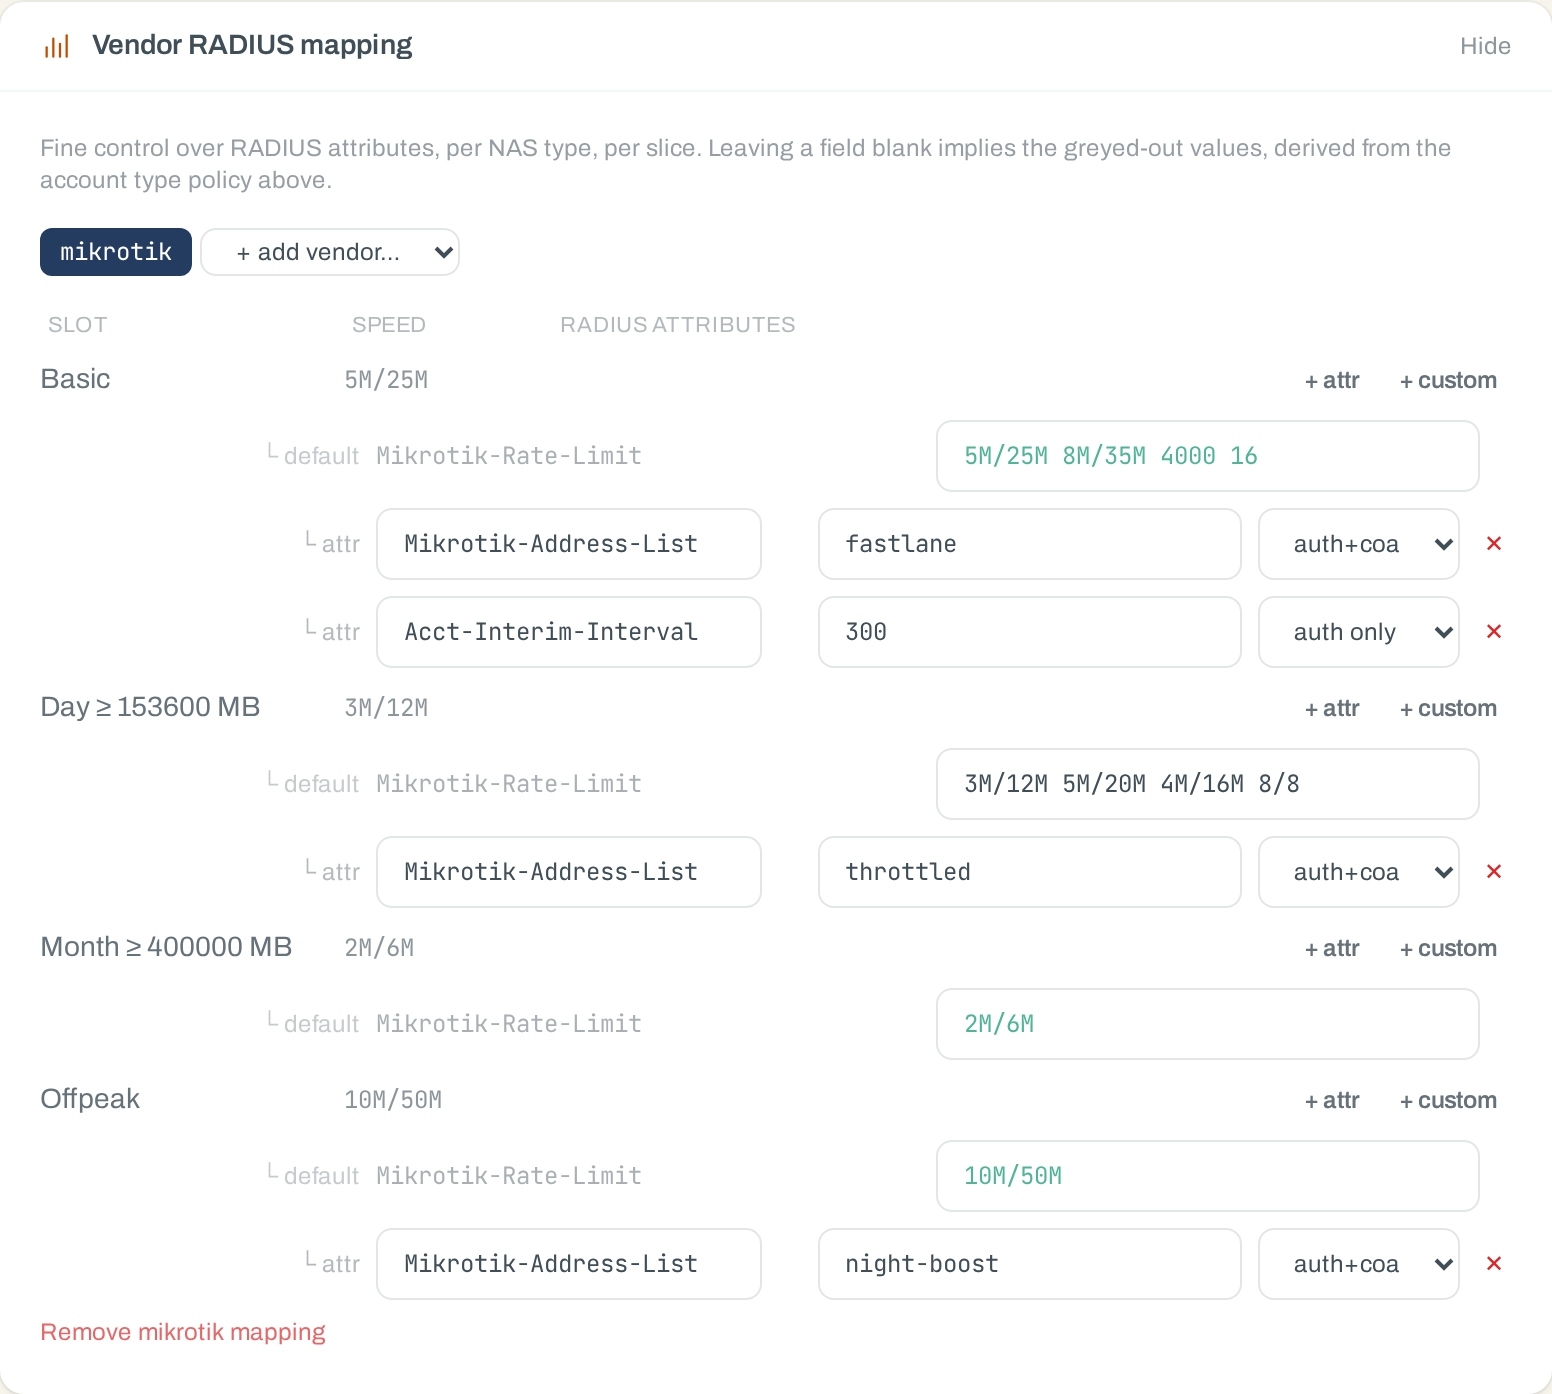
Vendor RADIUS attributes — the defaults just work
You normally never touch a RADIUS attribute. The speed policy above compiles into
each router vendor's native dialect automatically — Mikrotik-Rate-Limit
with the full burst quadruple on RouterOS and accel-ppp, Huawei/ZTE/NetElastic
numeric rate VSAs, Cisco ISG policy-maps, VAS Experts policing profiles,
Ericsson rate+burst pairs — and the NAS page shows exactly what each router will
receive. For most networks that is the whole story.
Power users get a per-tier escape hatch: Vendor RADIUS mapping, at the bottom of the account type editor. Every speed slot — each day tier, penalty tier, and the booster window — lists the attributes it sends by default, and each one can be overridden per slot: swap the numeric rates for a named QoS profile that lives on the router, override a single attribute's value, or add extra attributes outright — picked from the built-in dictionary or entered as raw vendor/attribute numbers for gear the dictionary has never heard of. Extras ride both the login reply and mid-session CoA updates (or login only, if scoped so).
4 · Add & renew subscribers
Manage → Users → New user: pick the offer (account type + price for the selling dealer), set username and password, optionally lock the MAC, save. The subscriber can connect immediately; billing starts per the account type's pay on activation setting.
- Renew — on the user page, Renew charges the dealer's credit and extends the period.
- Top-up — adds volume to the current period without moving the expiry date.
- Override bandwidth — a per-user rate limit that wins over the account type (support tool; remove it when done).
- Scheduled change — queue a different account type to apply at the period end.
- Bulk import — CSV import under Users for migrations.
The user page's Network Activity tab is your first support stop: live status, the 30-day usage chart, cap meters and the session log answer “why am I slow?” before the subscriber finishes asking.
5 · Scratch-card batches
Scratch cards turn account types into something a shop can sell. Manage → Scratch cards → New batch: choose the offer, the quantity and the unit price, and radcontrol generates the codes. Export the batch as CSV for the printer.
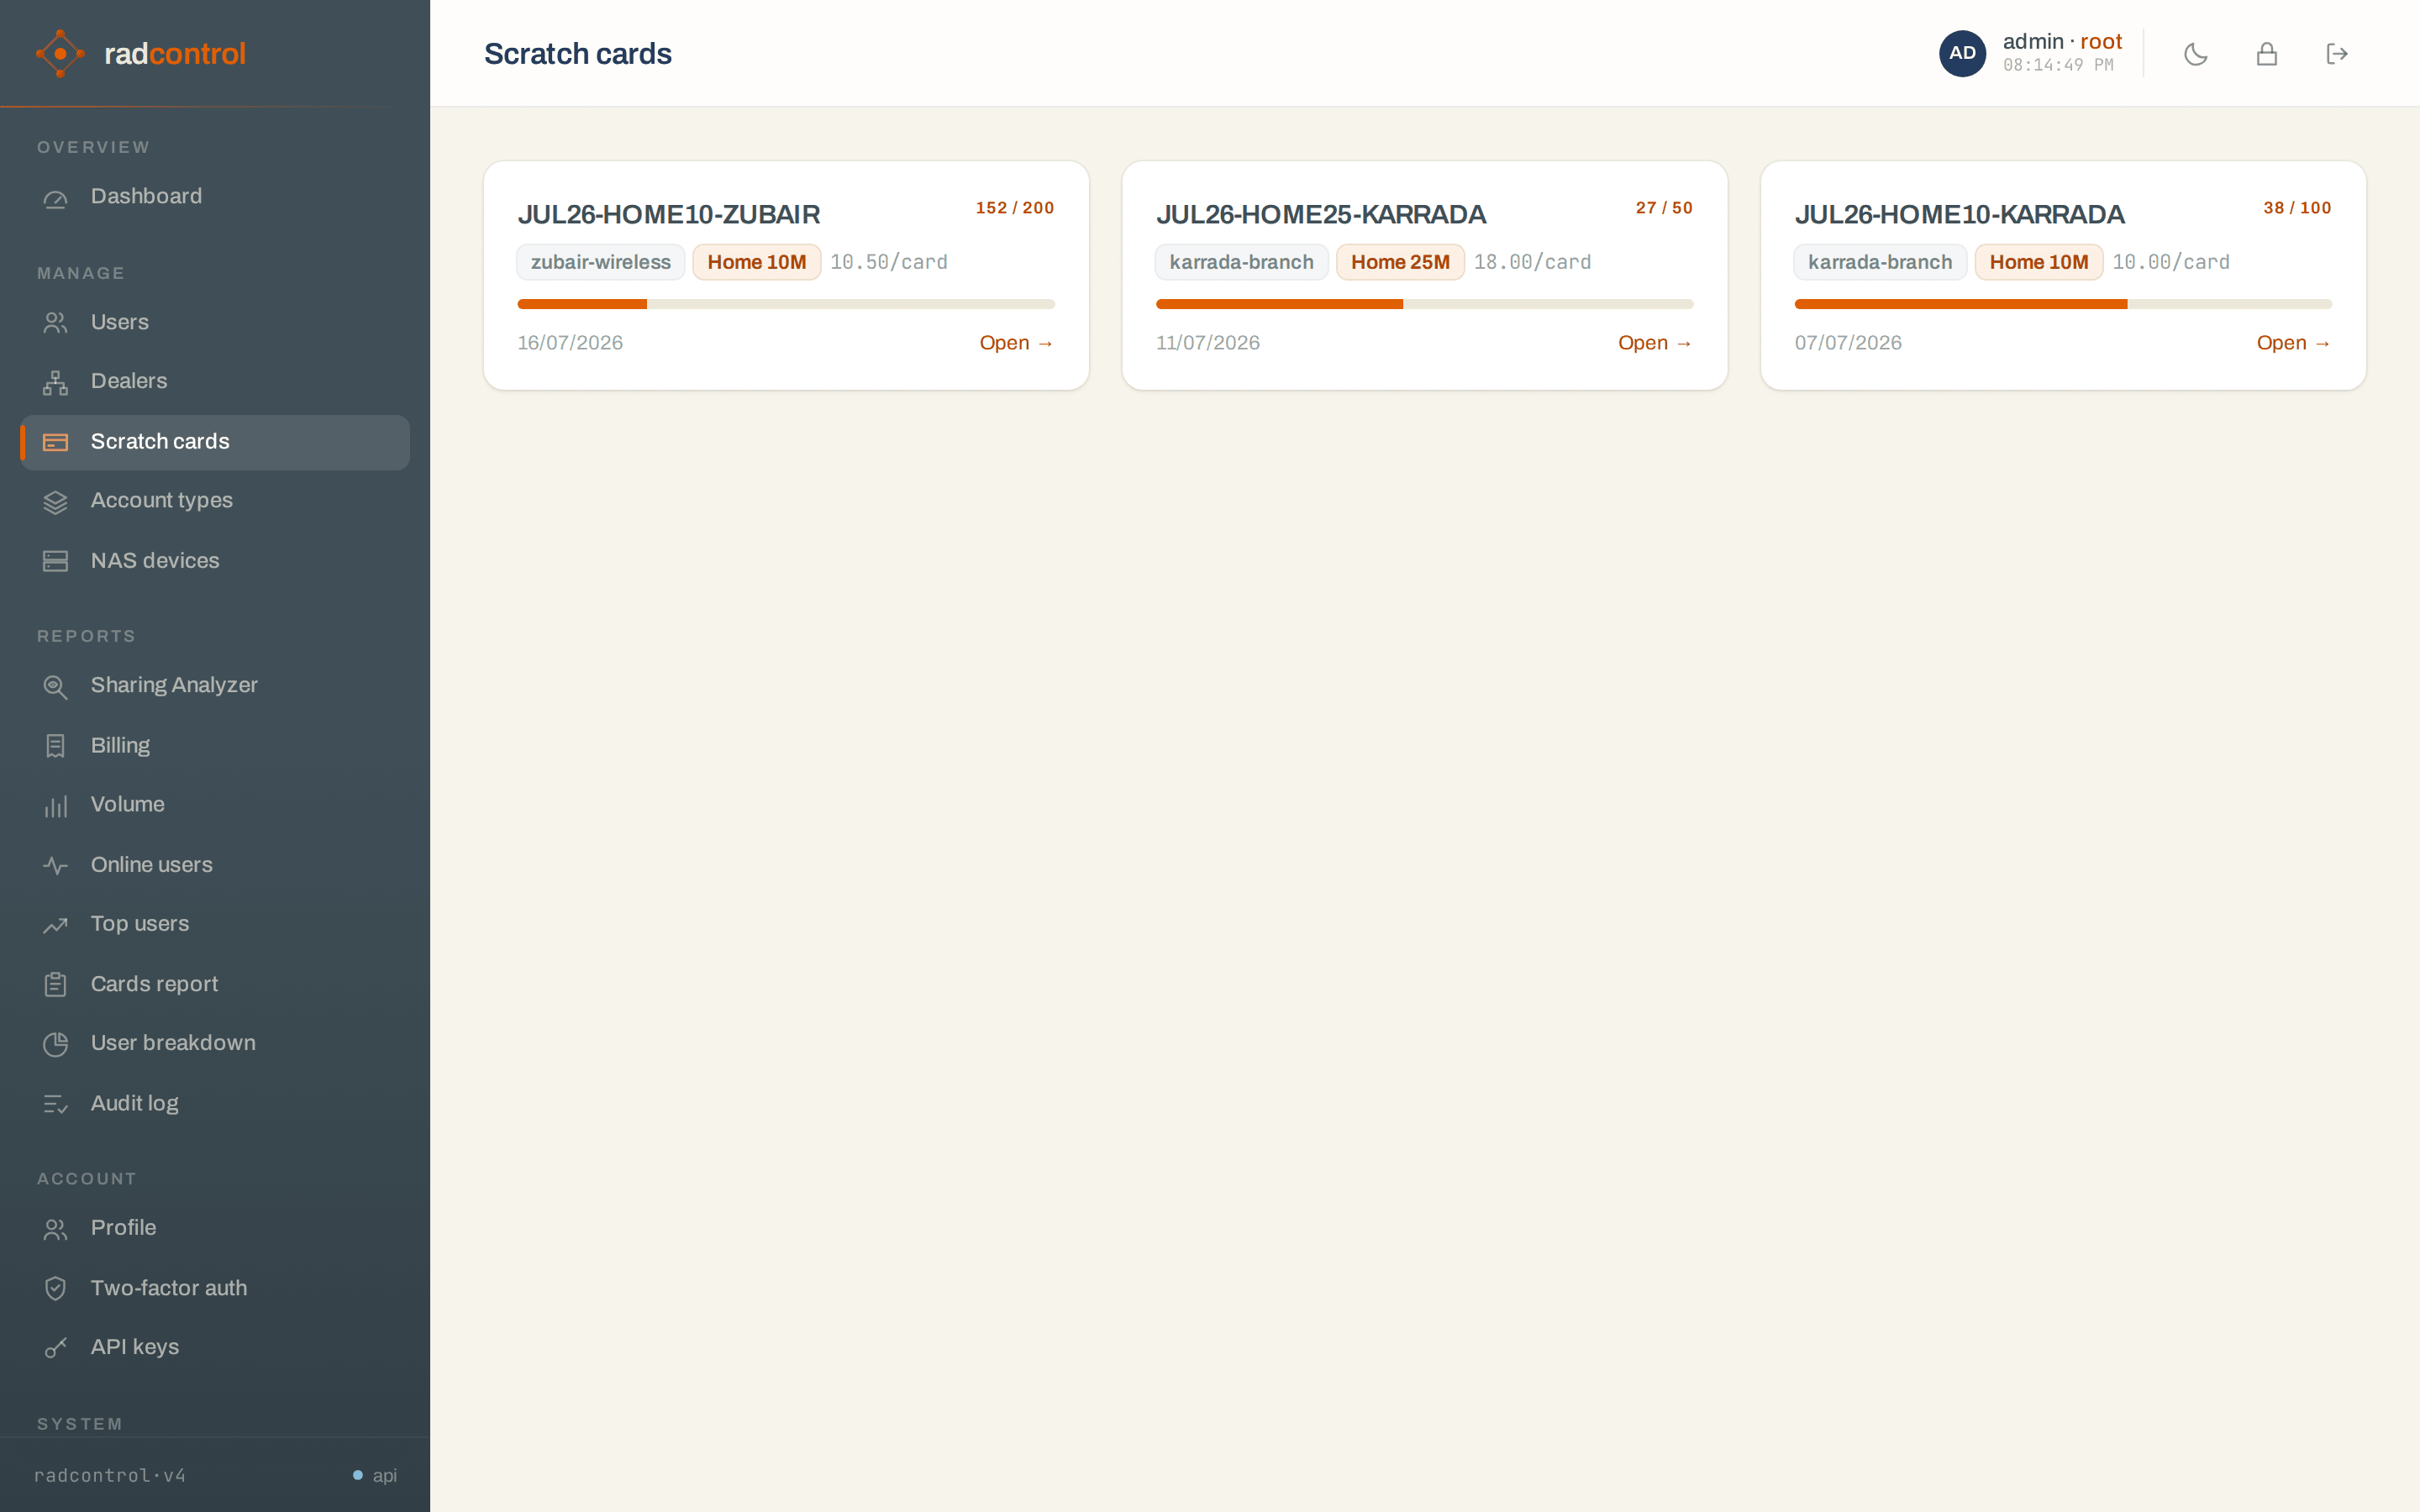
- A card activates itself on the subscriber's first login — no operator needed.
- The batch page tracks sold vs activated; the Cards report finds any single code.
- Batch cost is charged to the creating dealer's credit at generation time.
6 · Dealers & credit
Manage → Dealers shows the whole resale tree: balances, user counts, online counts, and each dealer's offer catalogue with markup. Top-level dealers buy credit from you; branches get credit from their parent.
- New dealer — creates a top-level dealer or a branch under one (subject to the parent's may create sub-dealers flag).
- Offers — enable account types for the dealer and set the commission added on top of the parent's price. The resolved price is what the dealer's operators pay per renewal.
- Credit — deposit, withdraw, or transfer parent→child from the dealer page. Every movement lands in the ledger with a running balance.
- Move users — reassign subscribers between dealers in bulk when territories change.
7 · Sharing Analyzer
The analyzer needs NetFlow from your routers. Everything else — collection, scoring, nightly model refits — is automatic.
Enable it per NAS
- Open the NAS page → NetFlow section → enable, and note the collector address and the sampling rate (default 1:100).
- Point the router at the collector — RouterOS shown, any NetFlow v9/IPFIX exporter works:
> /ip traffic-flow set enabled=yes active-flow-timeout=1m
> /ip traffic-flow target add dst-address=<collector-ip> port=2055 version=9
# sampling 1:100 — keep it identical to the NAS page setting
> /ip traffic-flow set packet-sampling=yes sampling-interval=100 sampling-space=0
- Export flows before NAT so subscriber IPs are visible to the collector.
- The NAS list shows a NetFlow badge with a flows-per-minute sparkline once data arrives; a mismatch badge appears if the router's sampling disagrees with the configured rate.
Read the report
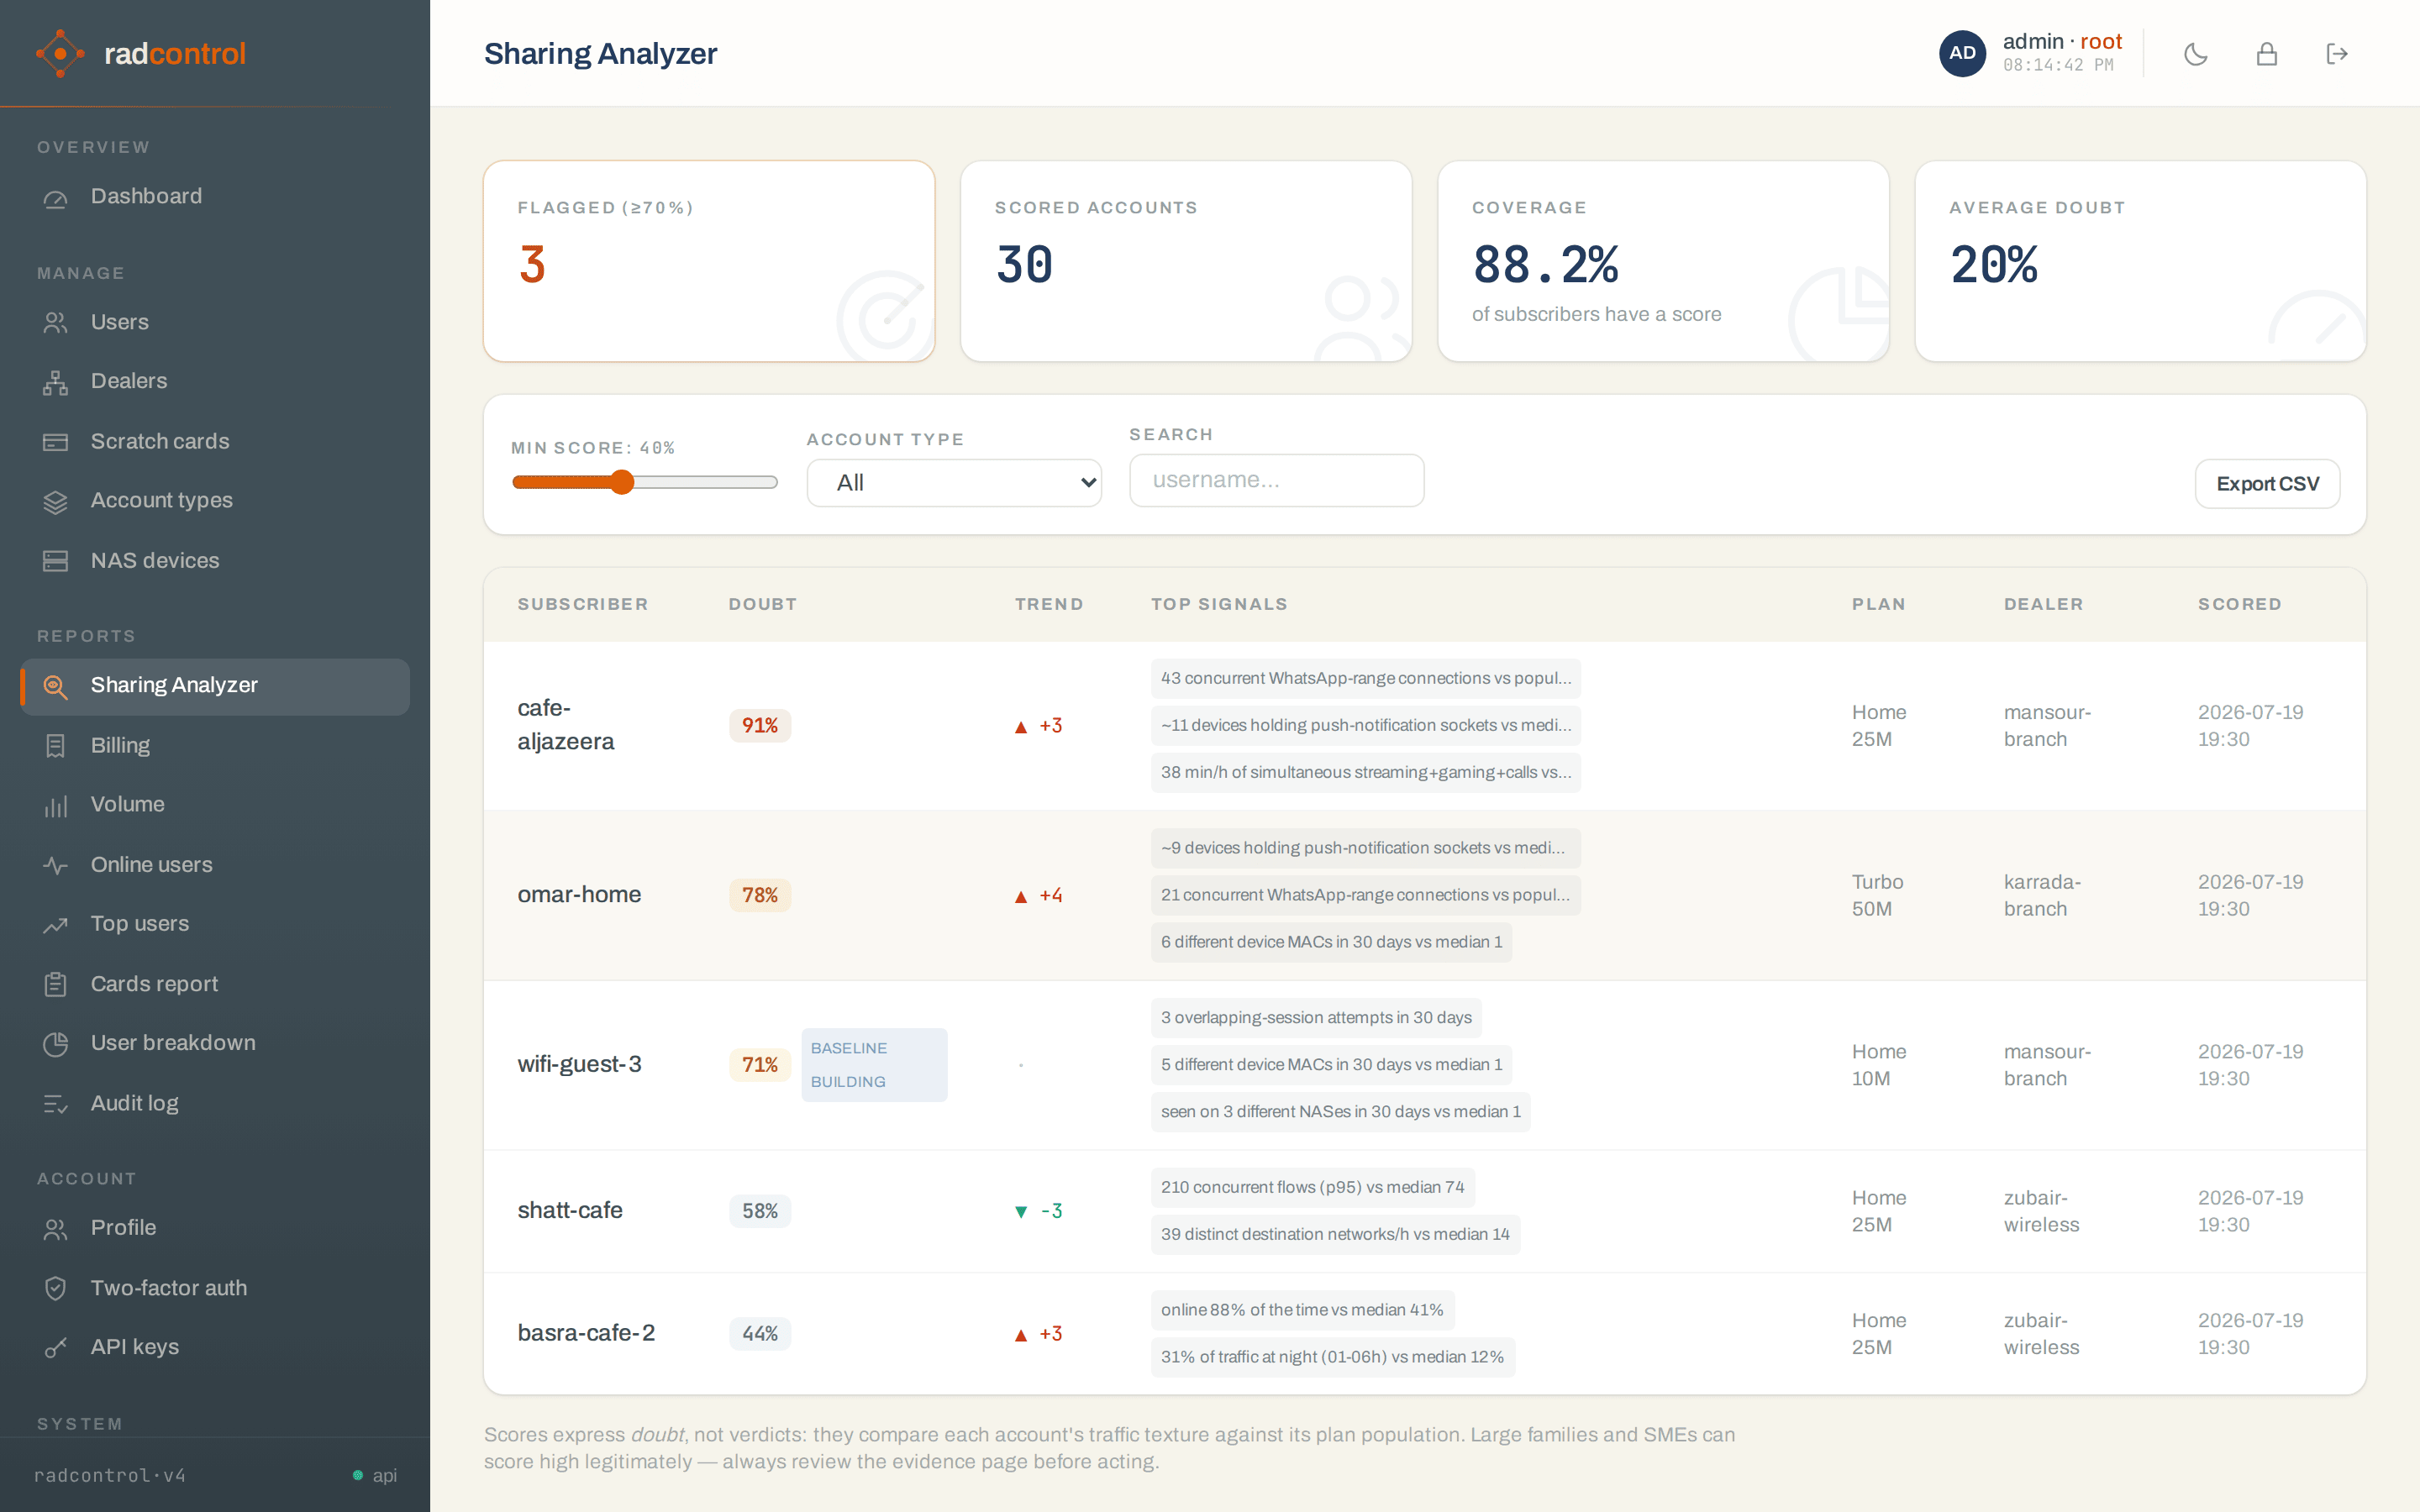
- Doubt scores are not verdicts. They compare an account's traffic texture against its account type population. A large family can score high legitimately.
- New installs show baseline building for about two weeks; scores start as honest heuristics and switch to the ML ensemble once enough history exists.
- Click any account for the evidence page: score history, weekly activity heatmap, device-count signals, traffic mix. Review it before talking to the customer.
- A sensible workflow: filter to ≥70%, check evidence, then upsell a family account type — flagged accounts are your best leads, not your enemies.
8 · Jibaya — money collection
Jibaya (جباية) is the doorstep cash-collection add-on: your collectors walk their round with a phone app that knows who owes what, take the money, and the subscriber renews on the spot. It's a licensed feature — if System → License lists it, a Jibaya entry appears in the navigation for every dealer account, and collectors can sign in to the app.
Set the money up first
- System → Currency — currency code, symbol, prefix/suffix, decimals.
If you price in millions (LBP, IQD, IRR…), turn on the million
multiplier: you then type and read every amount in millions, so a plan costs
20 MLLinstead of eight digits. Your chosen decimals still apply, so at two decimals half a million reads20.50 MLL— and printed and emailed receipts spell the real figure out,20,500,000 LL. Set it before you price anything, since it changes what every stored number means. Set the WhatsApp country code here too, so local numbers turn into working chat links. If you owe a sales tax, name it (VAT, TVA…) and give its rate on the same page: your prices stay exactly as they are — receipts simply add a line showing how much tax the total already contains. - System → Branding — your ISP name and logo. Both appear on the app's top bar and on printed and emailed receipts.
- System → Email options (optional) — with SMTP configured, a receipt is emailed automatically to any subscriber who has an email address.
Create your collectors
Open Jibaya as the dealer who employs them and use New collector at the bottom of the page: login, password, and optionally an email and a phone number. A collector is a restricted operator — they can sign in to the app and nothing else; the web console refuses them.
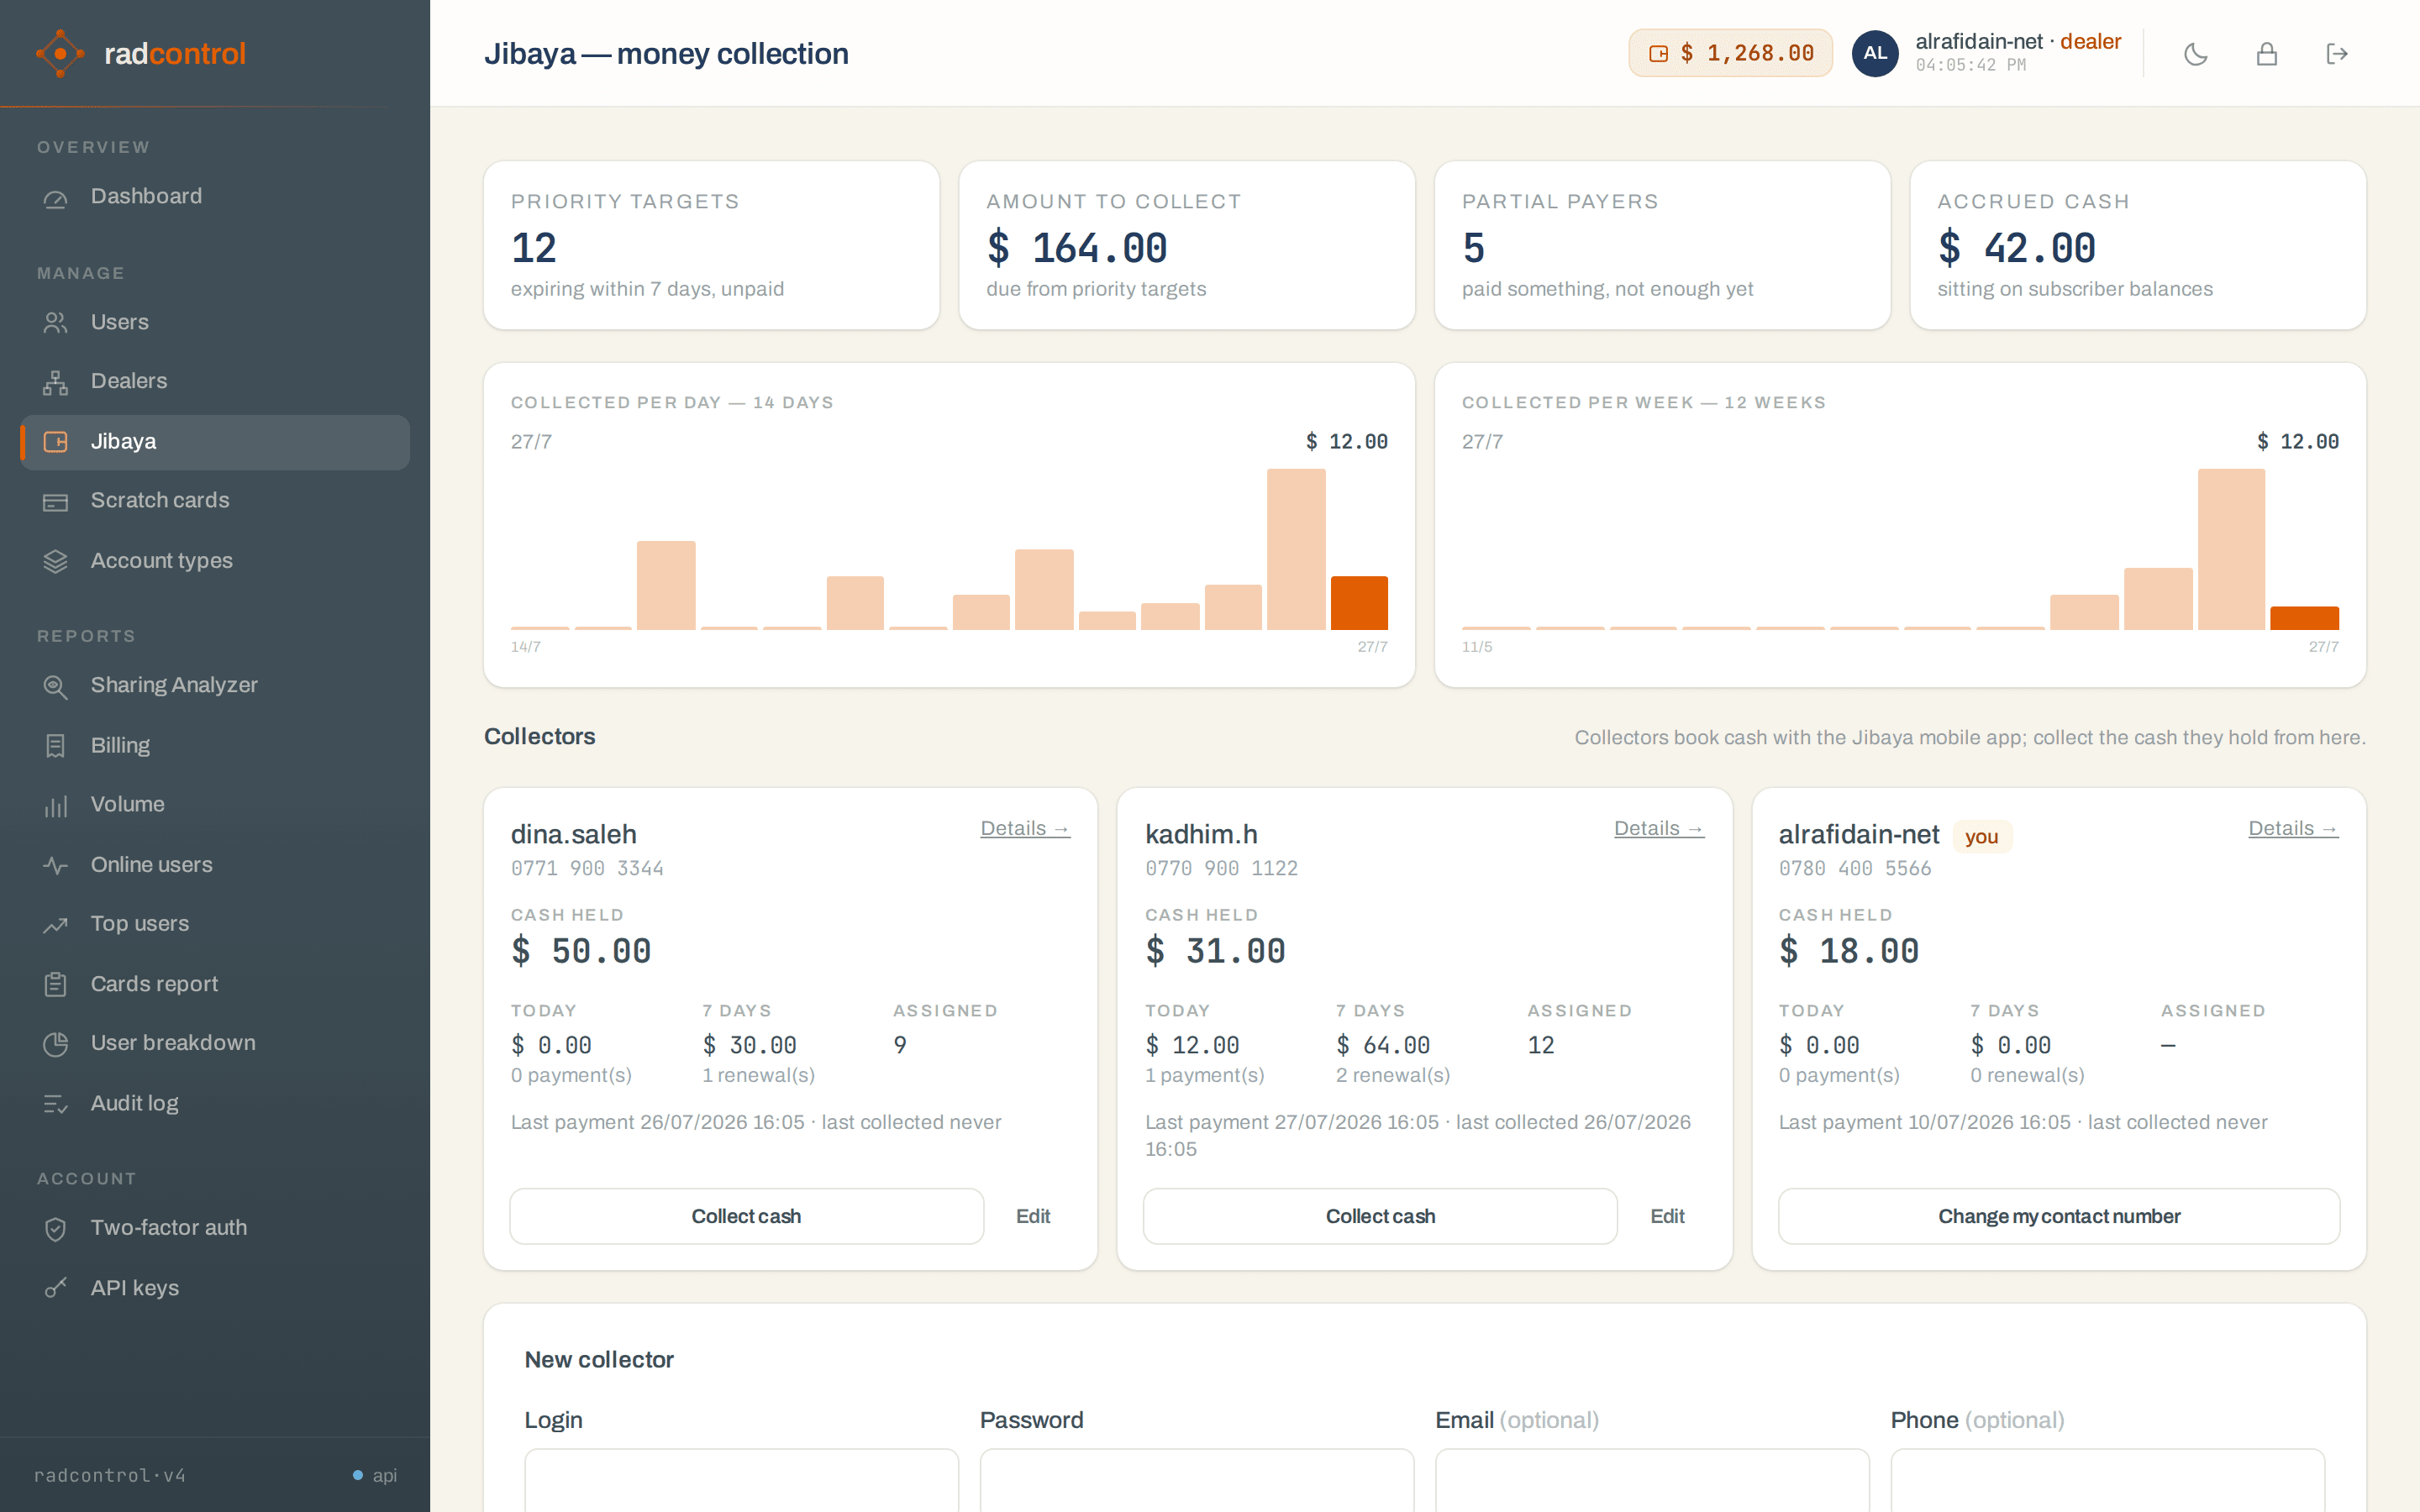
- Sees all users — off by default: a collector only sees the subscribers assigned to them. Turn it on for a stand-in who covers the whole book.
- Archive a collector who leaves; their history stays in the ledger.
- Suspend revokes every app session they hold, immediately.
Assign the round
- Manage → Users — select subscribers and use Assign collector for bulk assignment; or set Preferred collector on a single user's form.
- Fill in each subscriber's address and phone. The app shows the address under the name and turns the phone into call and WhatsApp buttons — a round without addresses is much slower to walk.
Install the app
radcontrol Jibaya is coming to Google Play and the App Store; until then write to info@radcontrol.org for a build. On first run the collector enters your server address (the same one staff use in a browser) and their login. The session is kept in the phone's keychain — signing in is a once-a-device job.
A day on the round
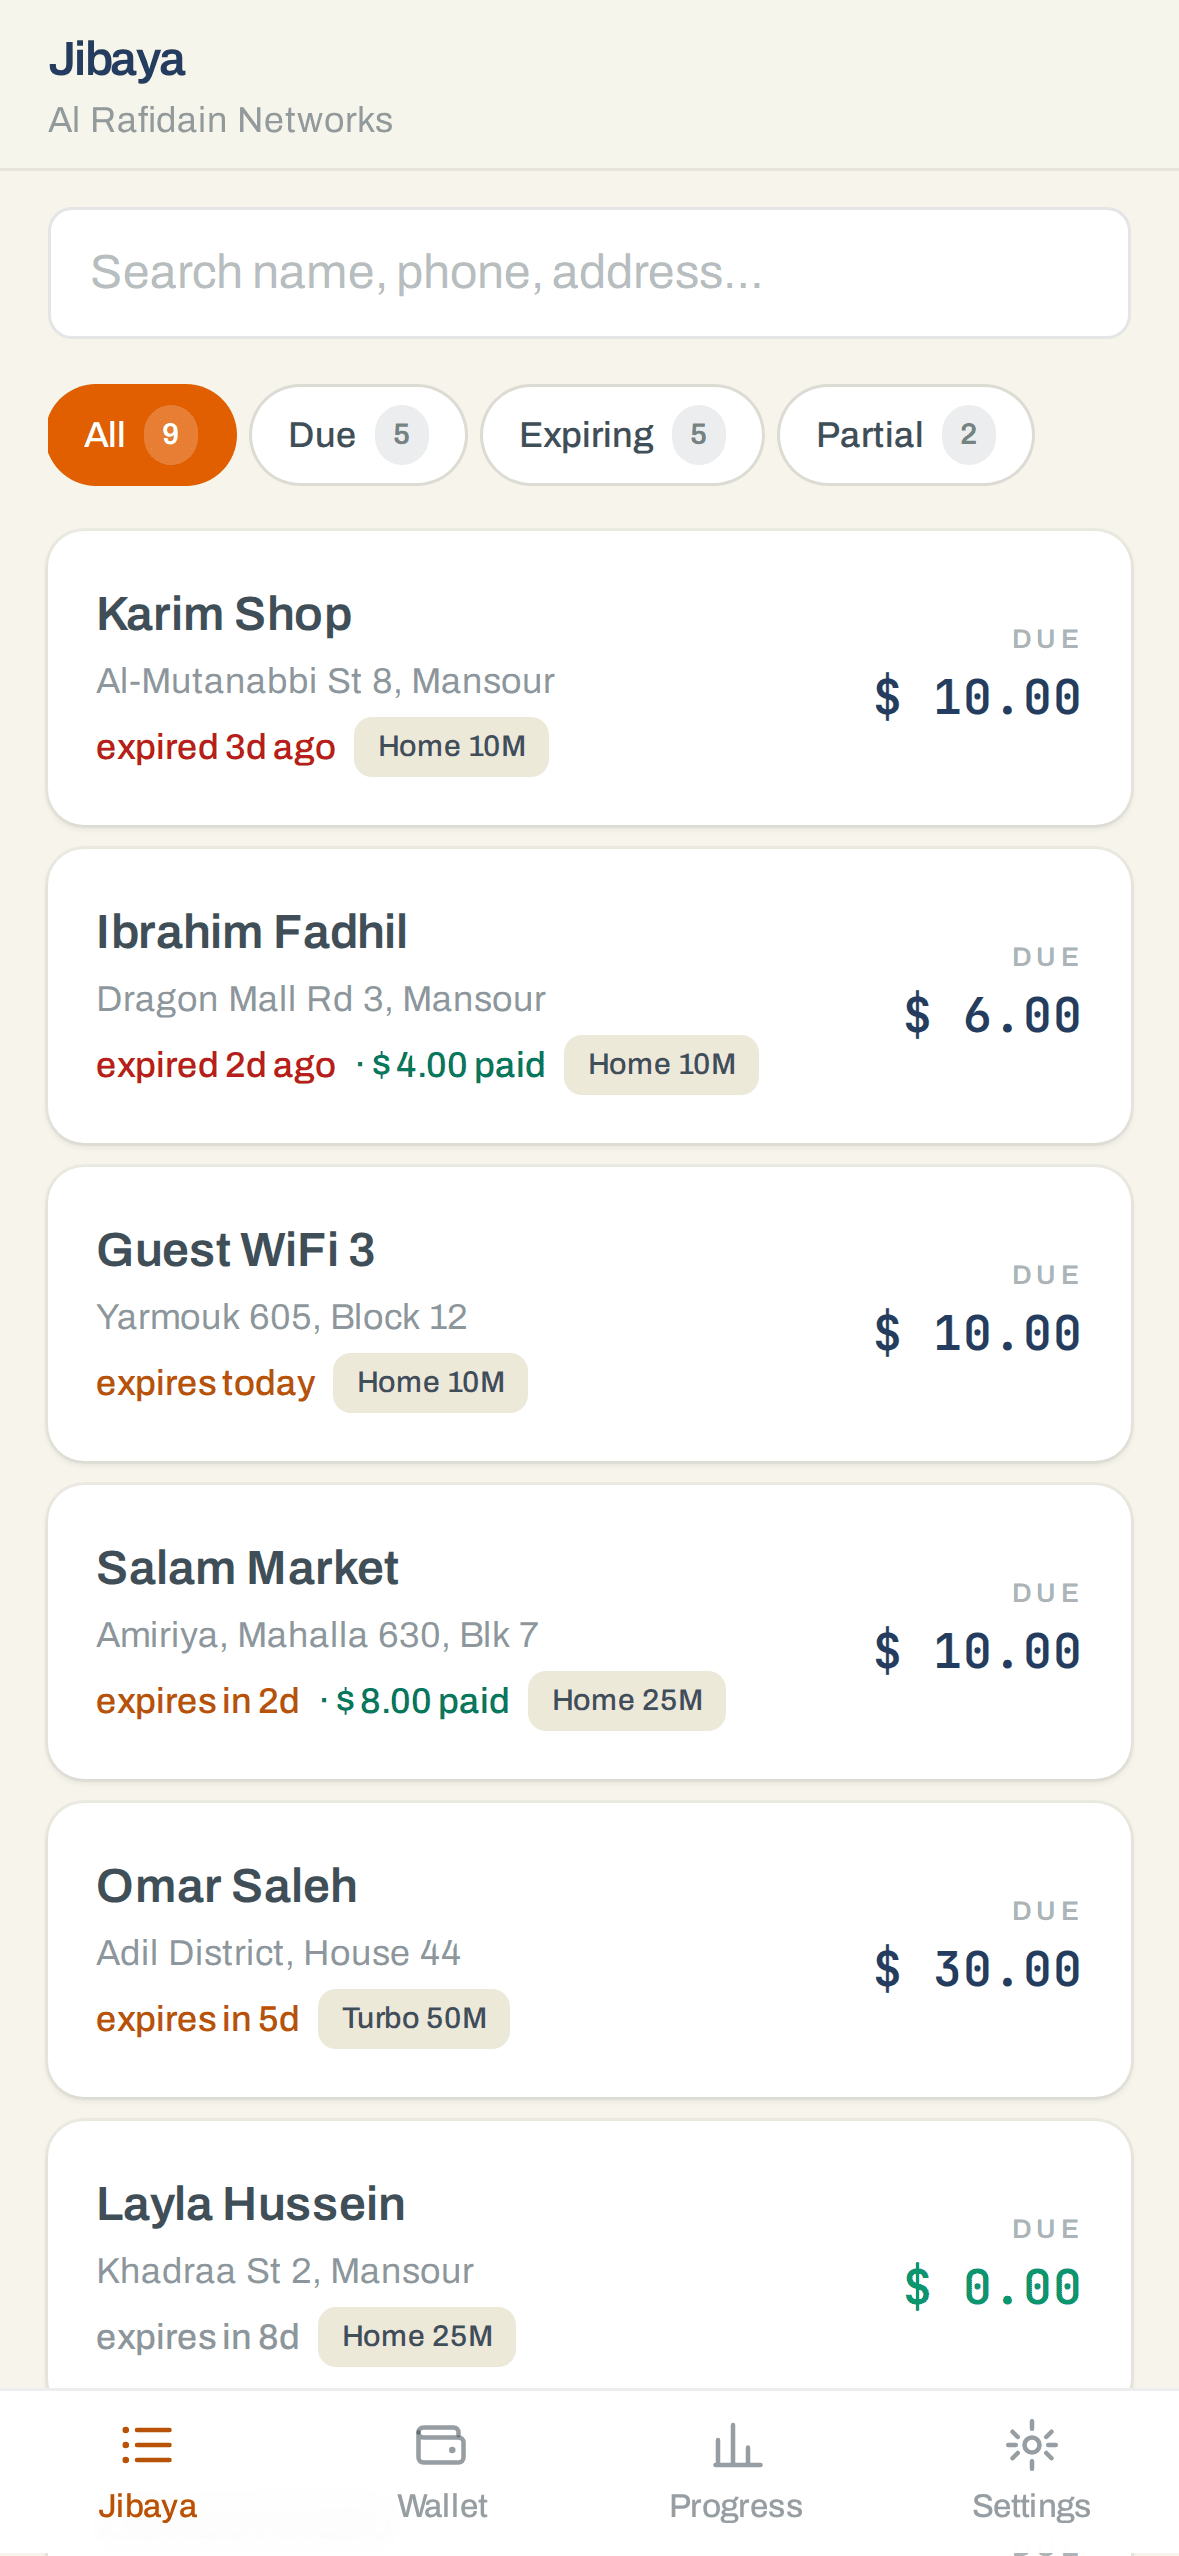
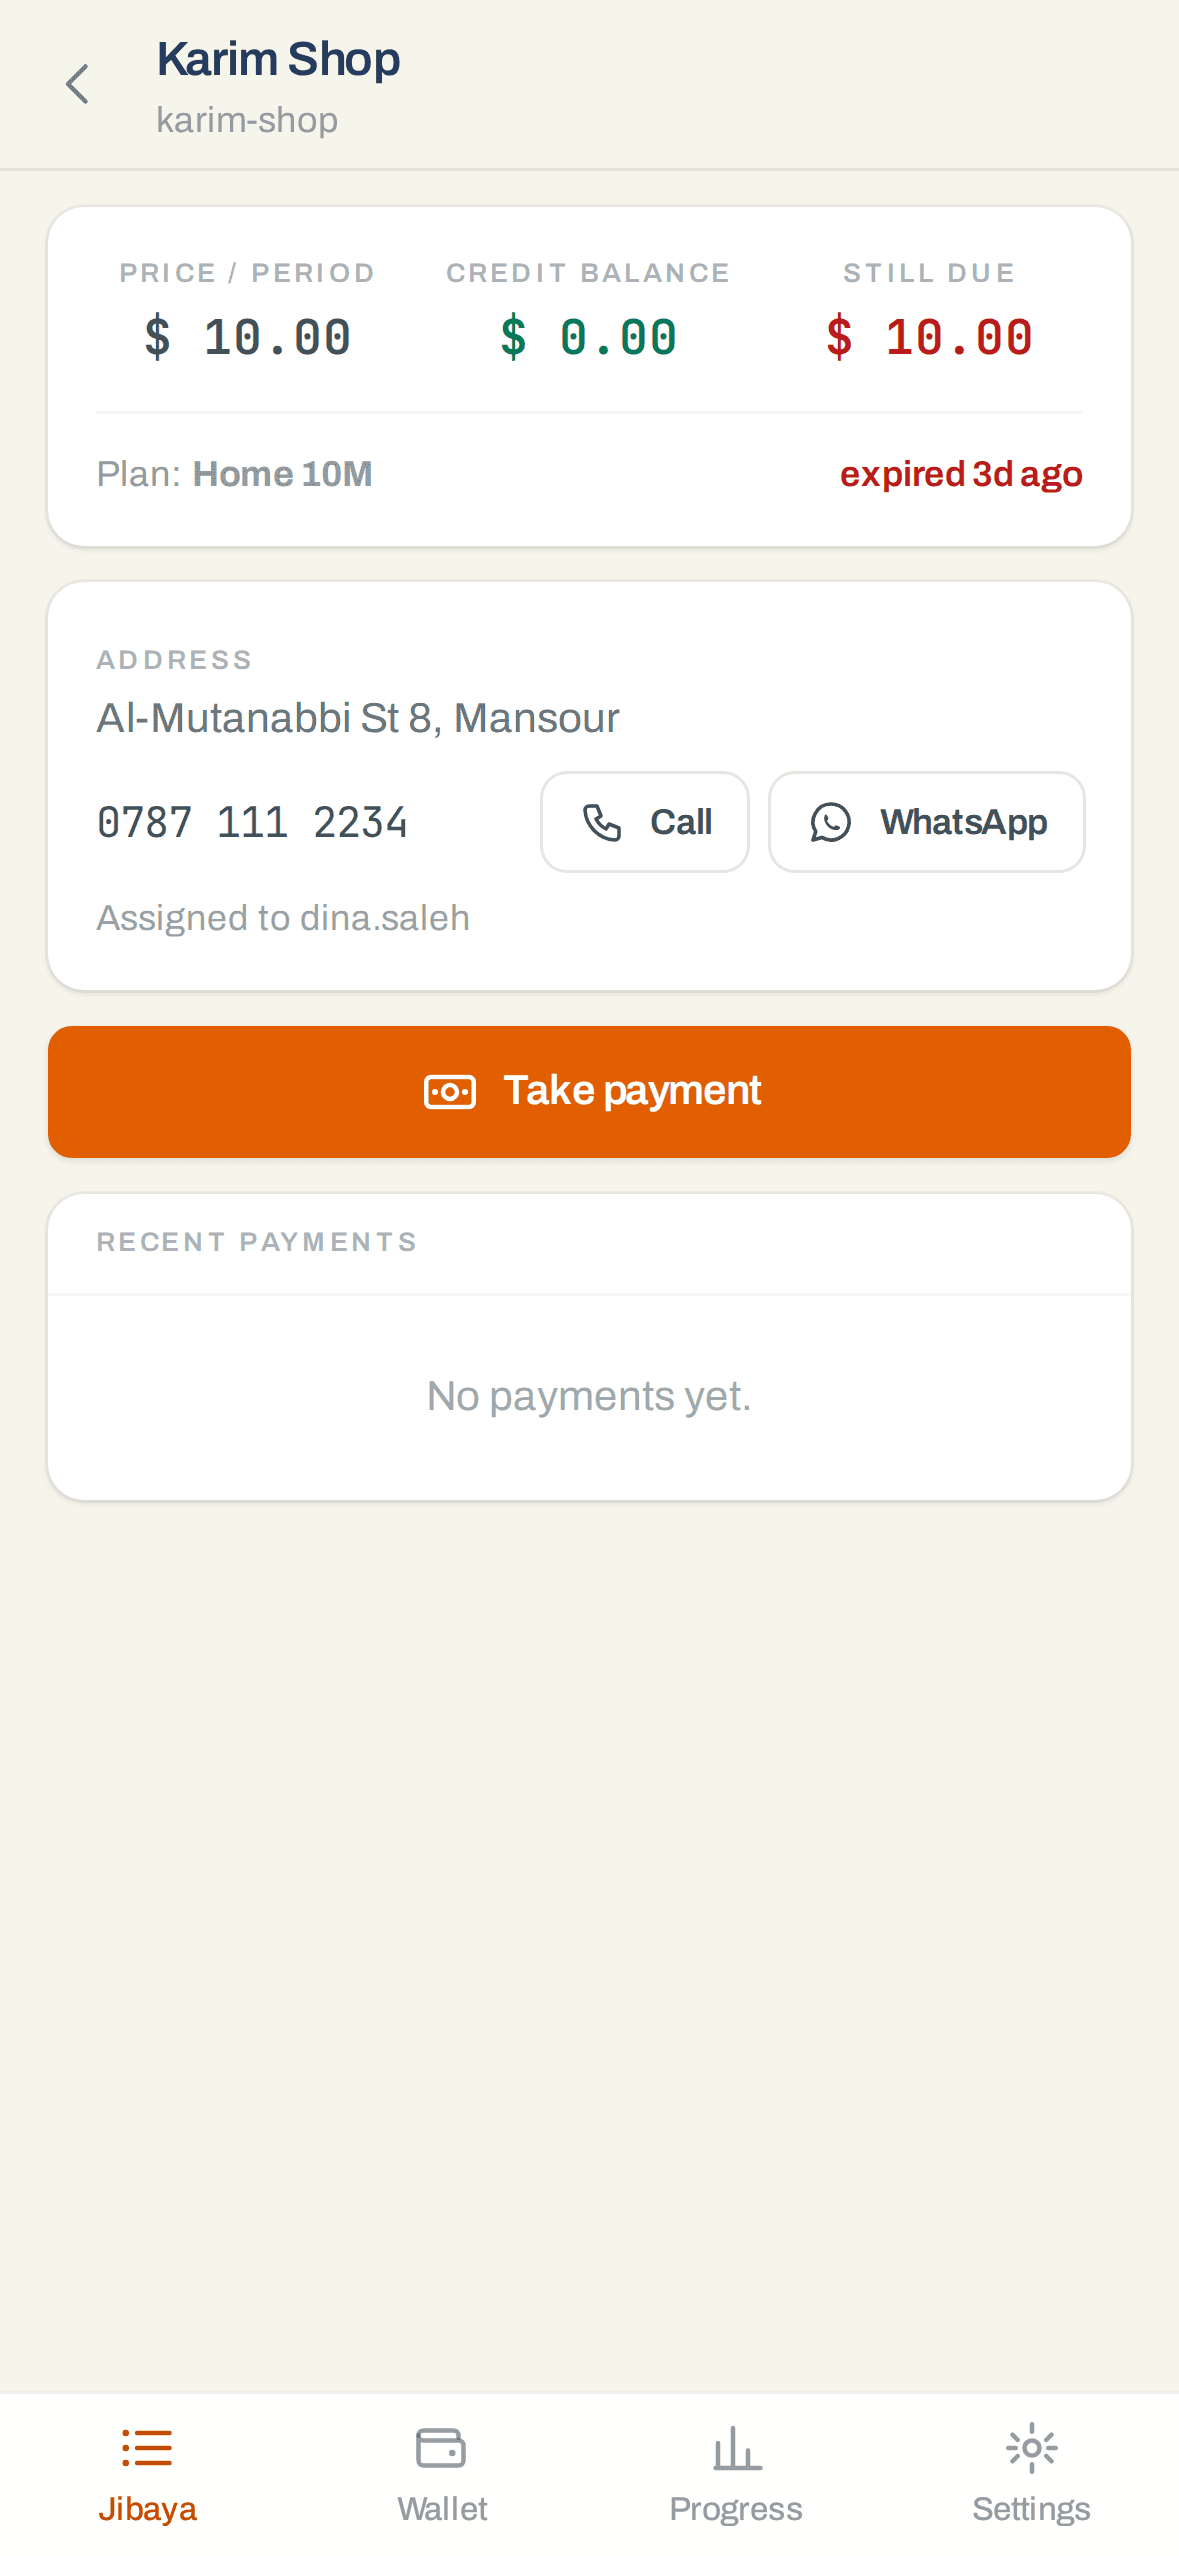
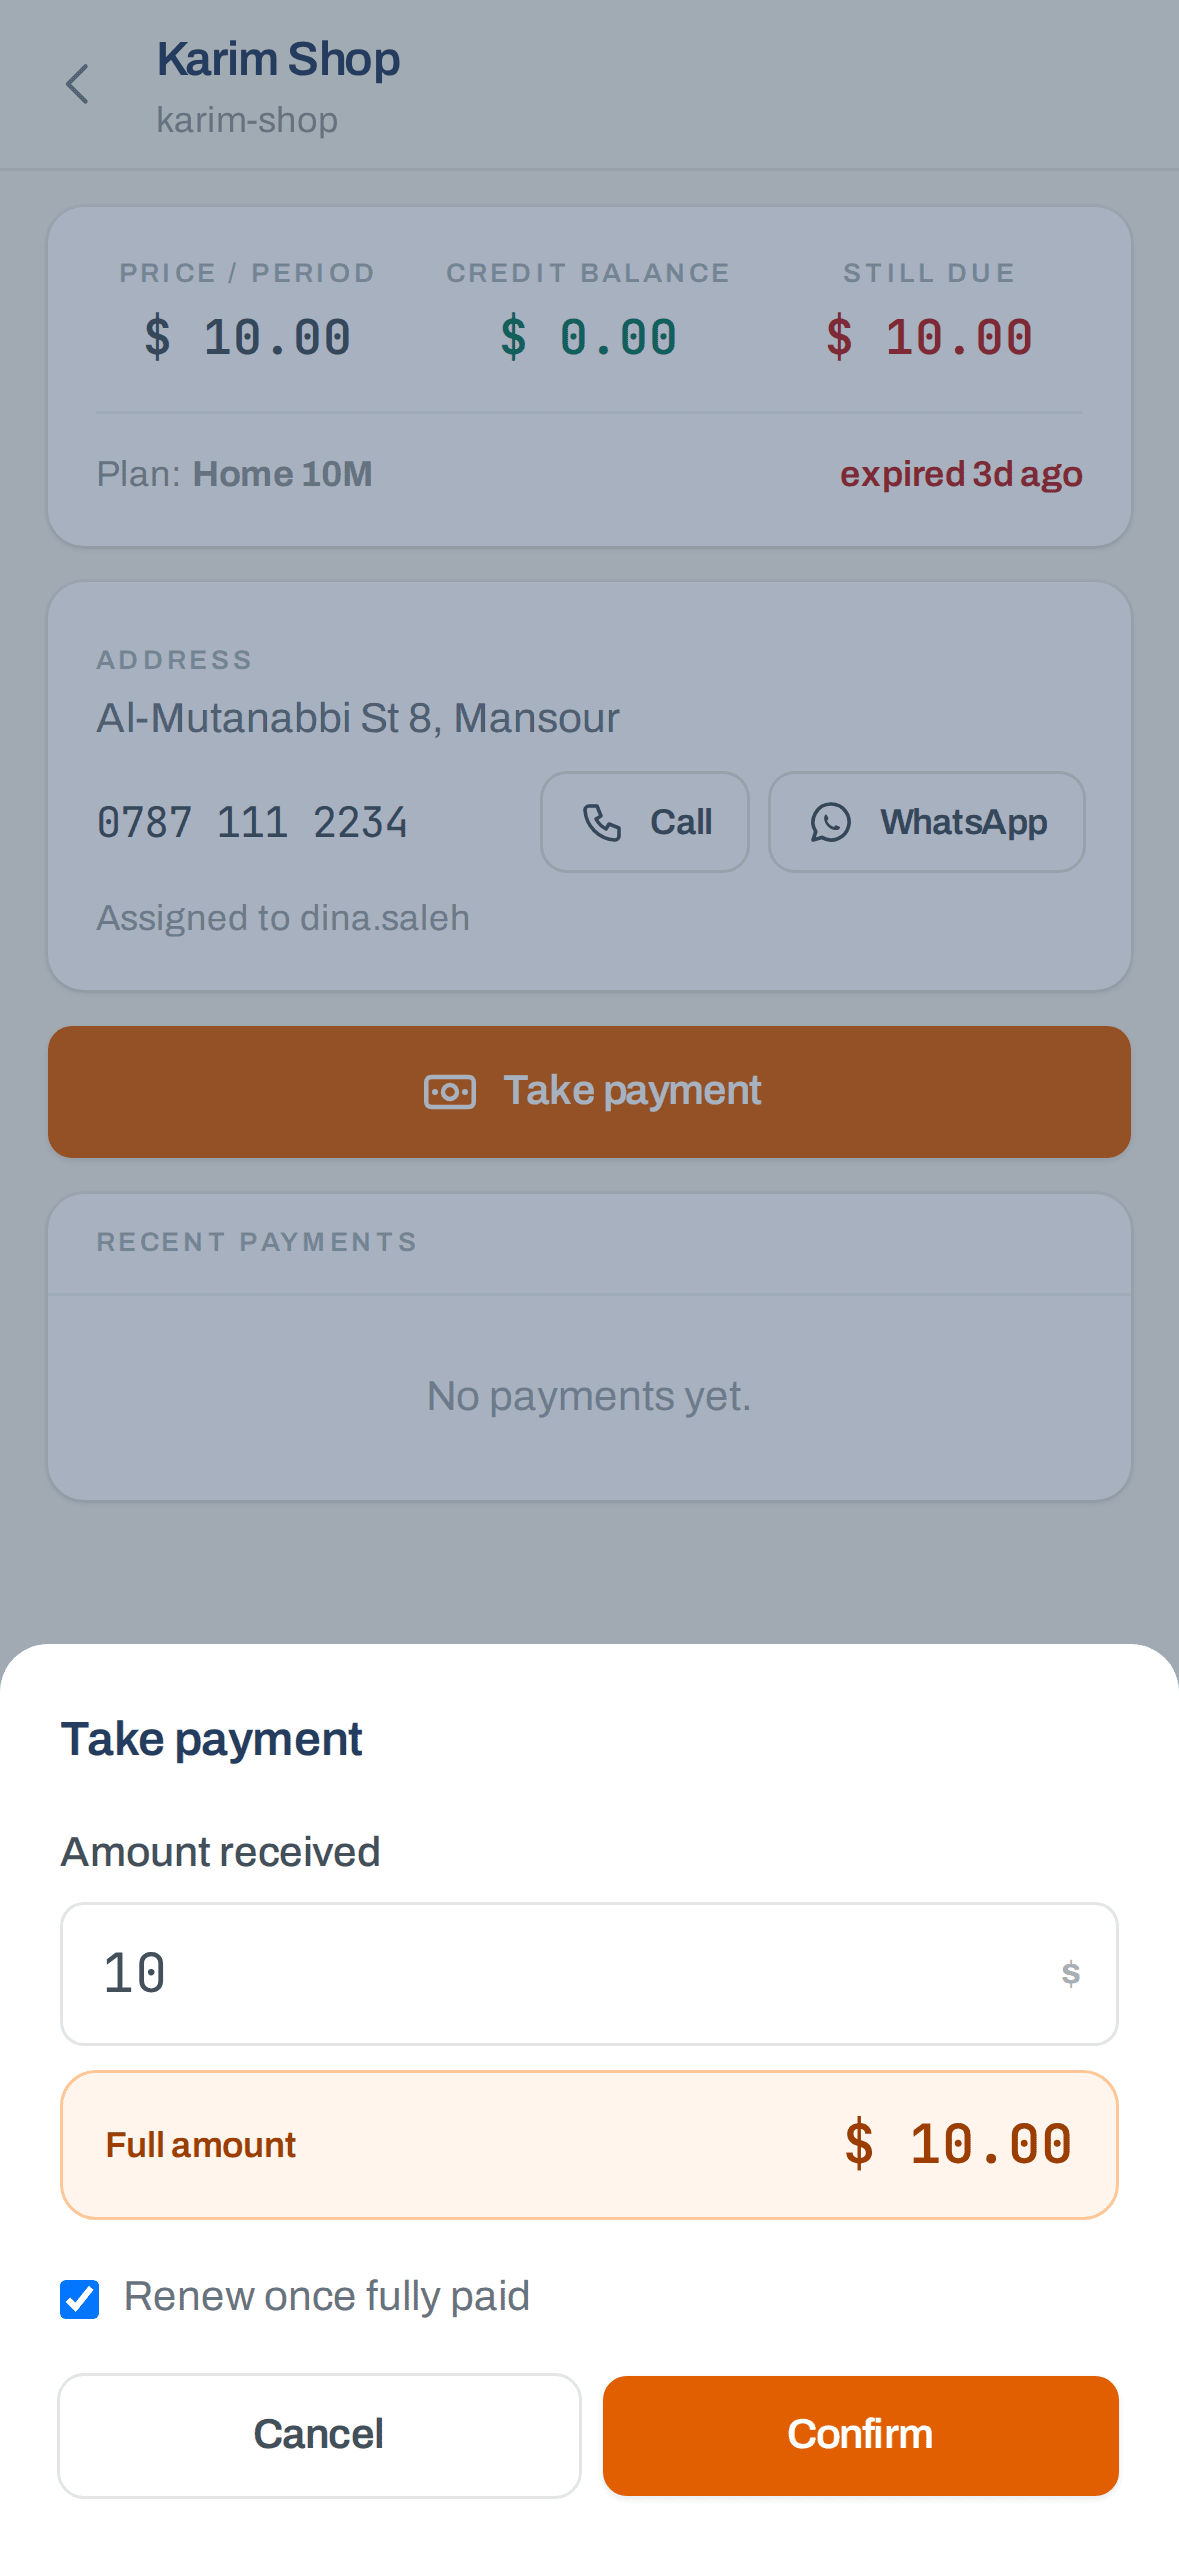
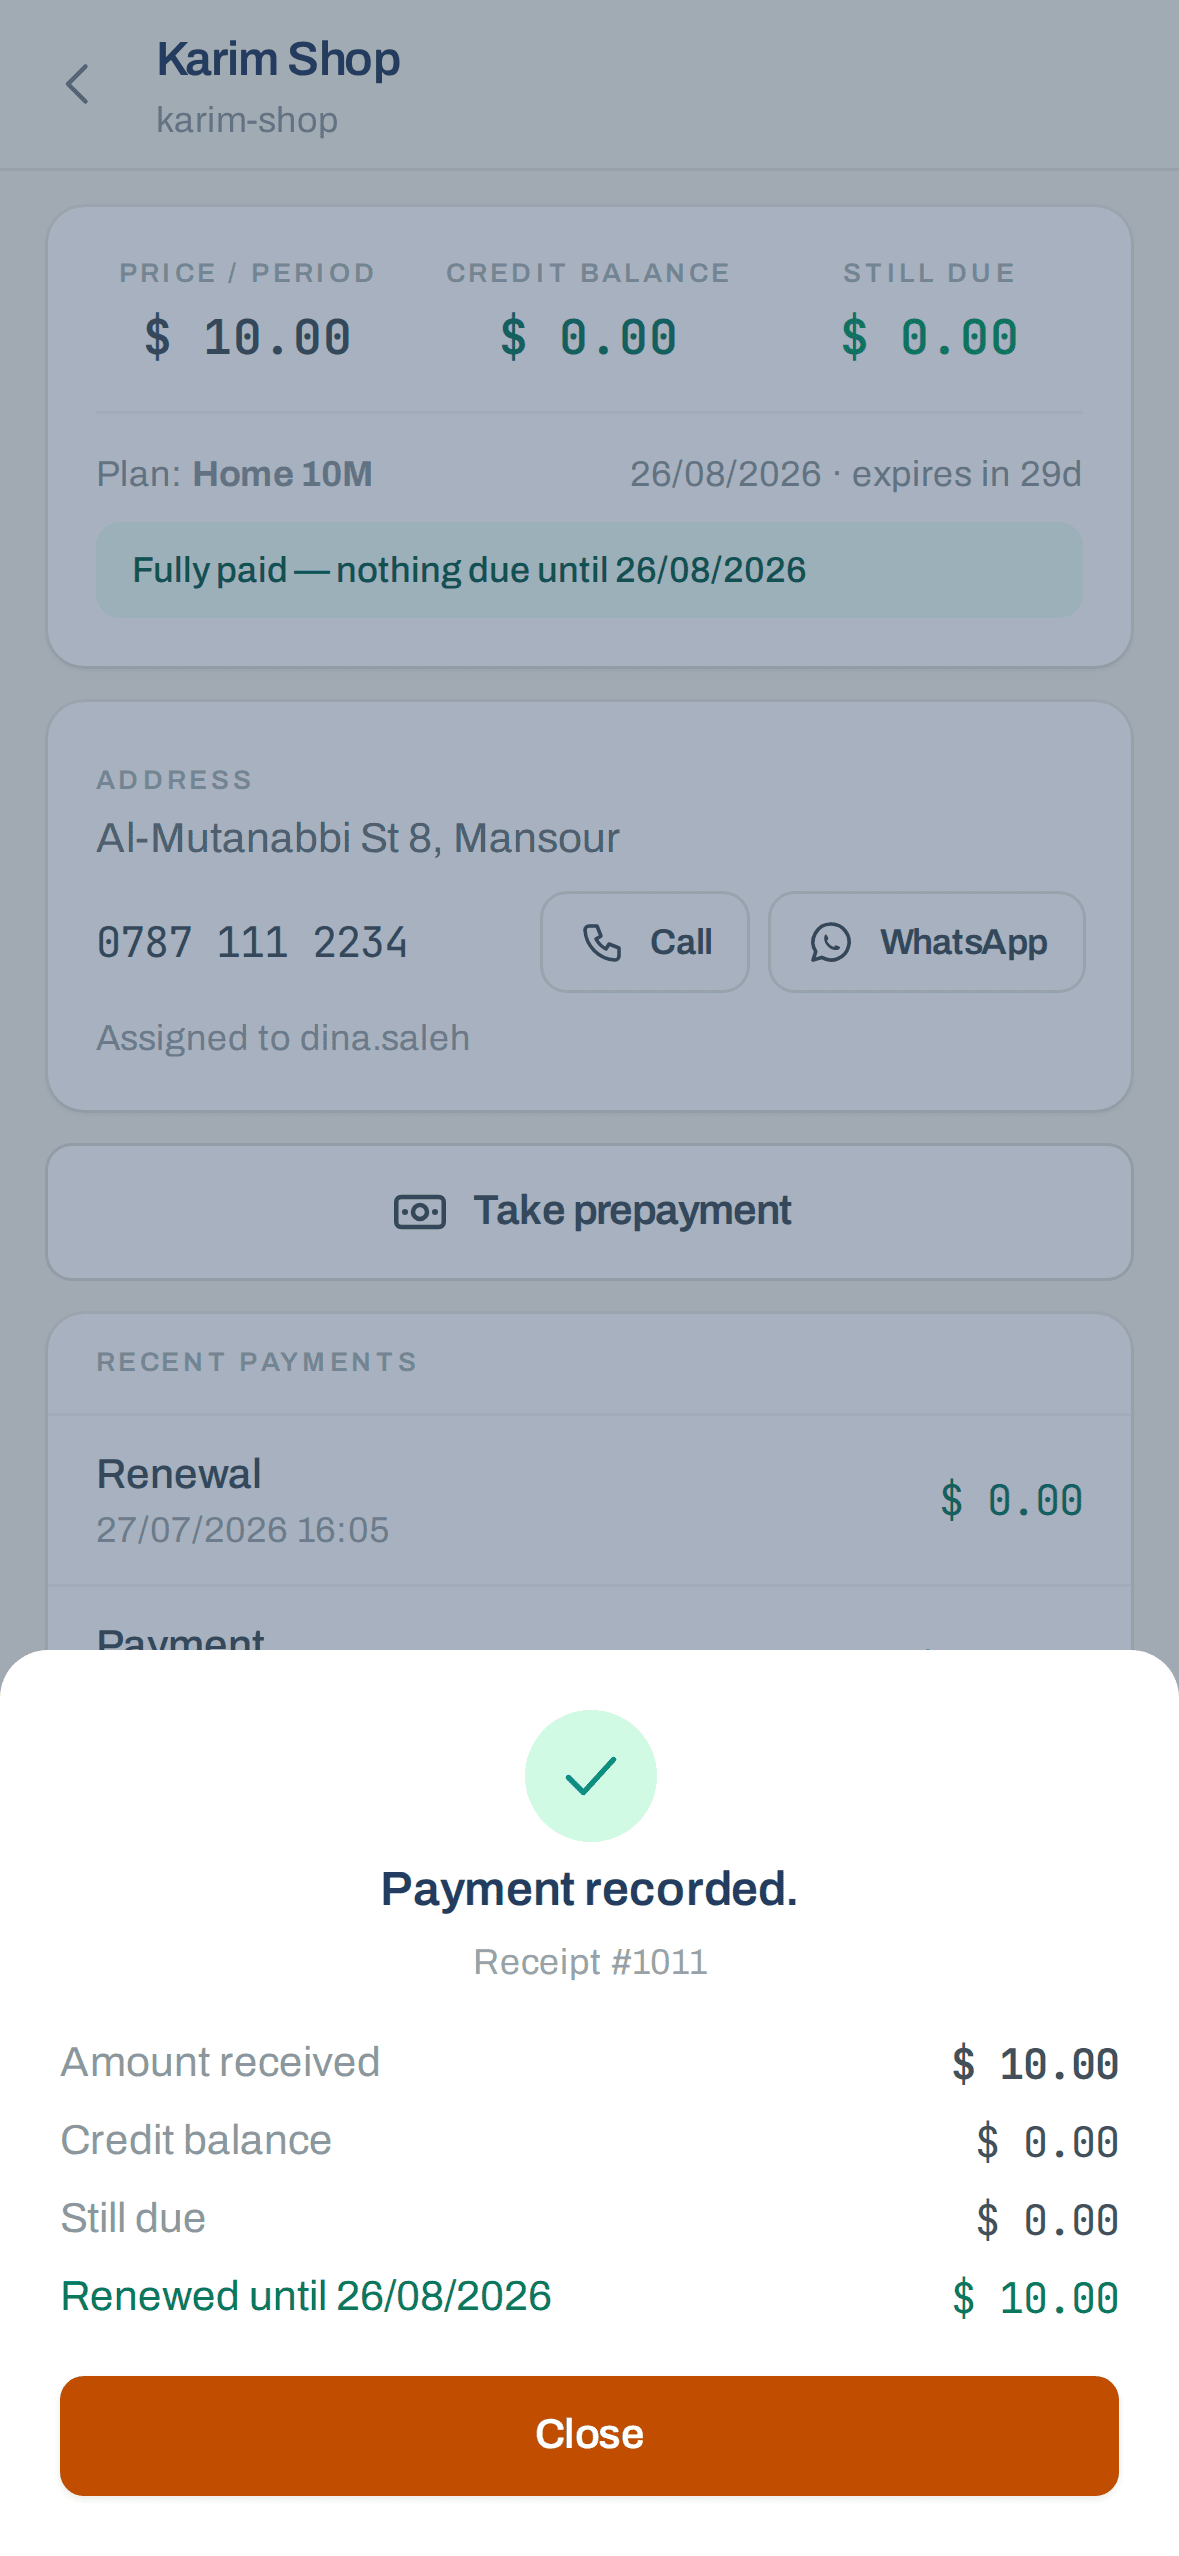
- Part payments are normal. Anything short of the price sits on the subscriber's balance; the moment the balance covers the period, the account type renews and the dealer's prepaid credit is charged exactly as a console renewal would charge it.
- Overpayment carries. Money beyond the period stacks into further periods, and the remainder stays as credit toward the next renewal.
- Nothing due? Taking money anyway is booked as a prepayment — the app says so before it books it.
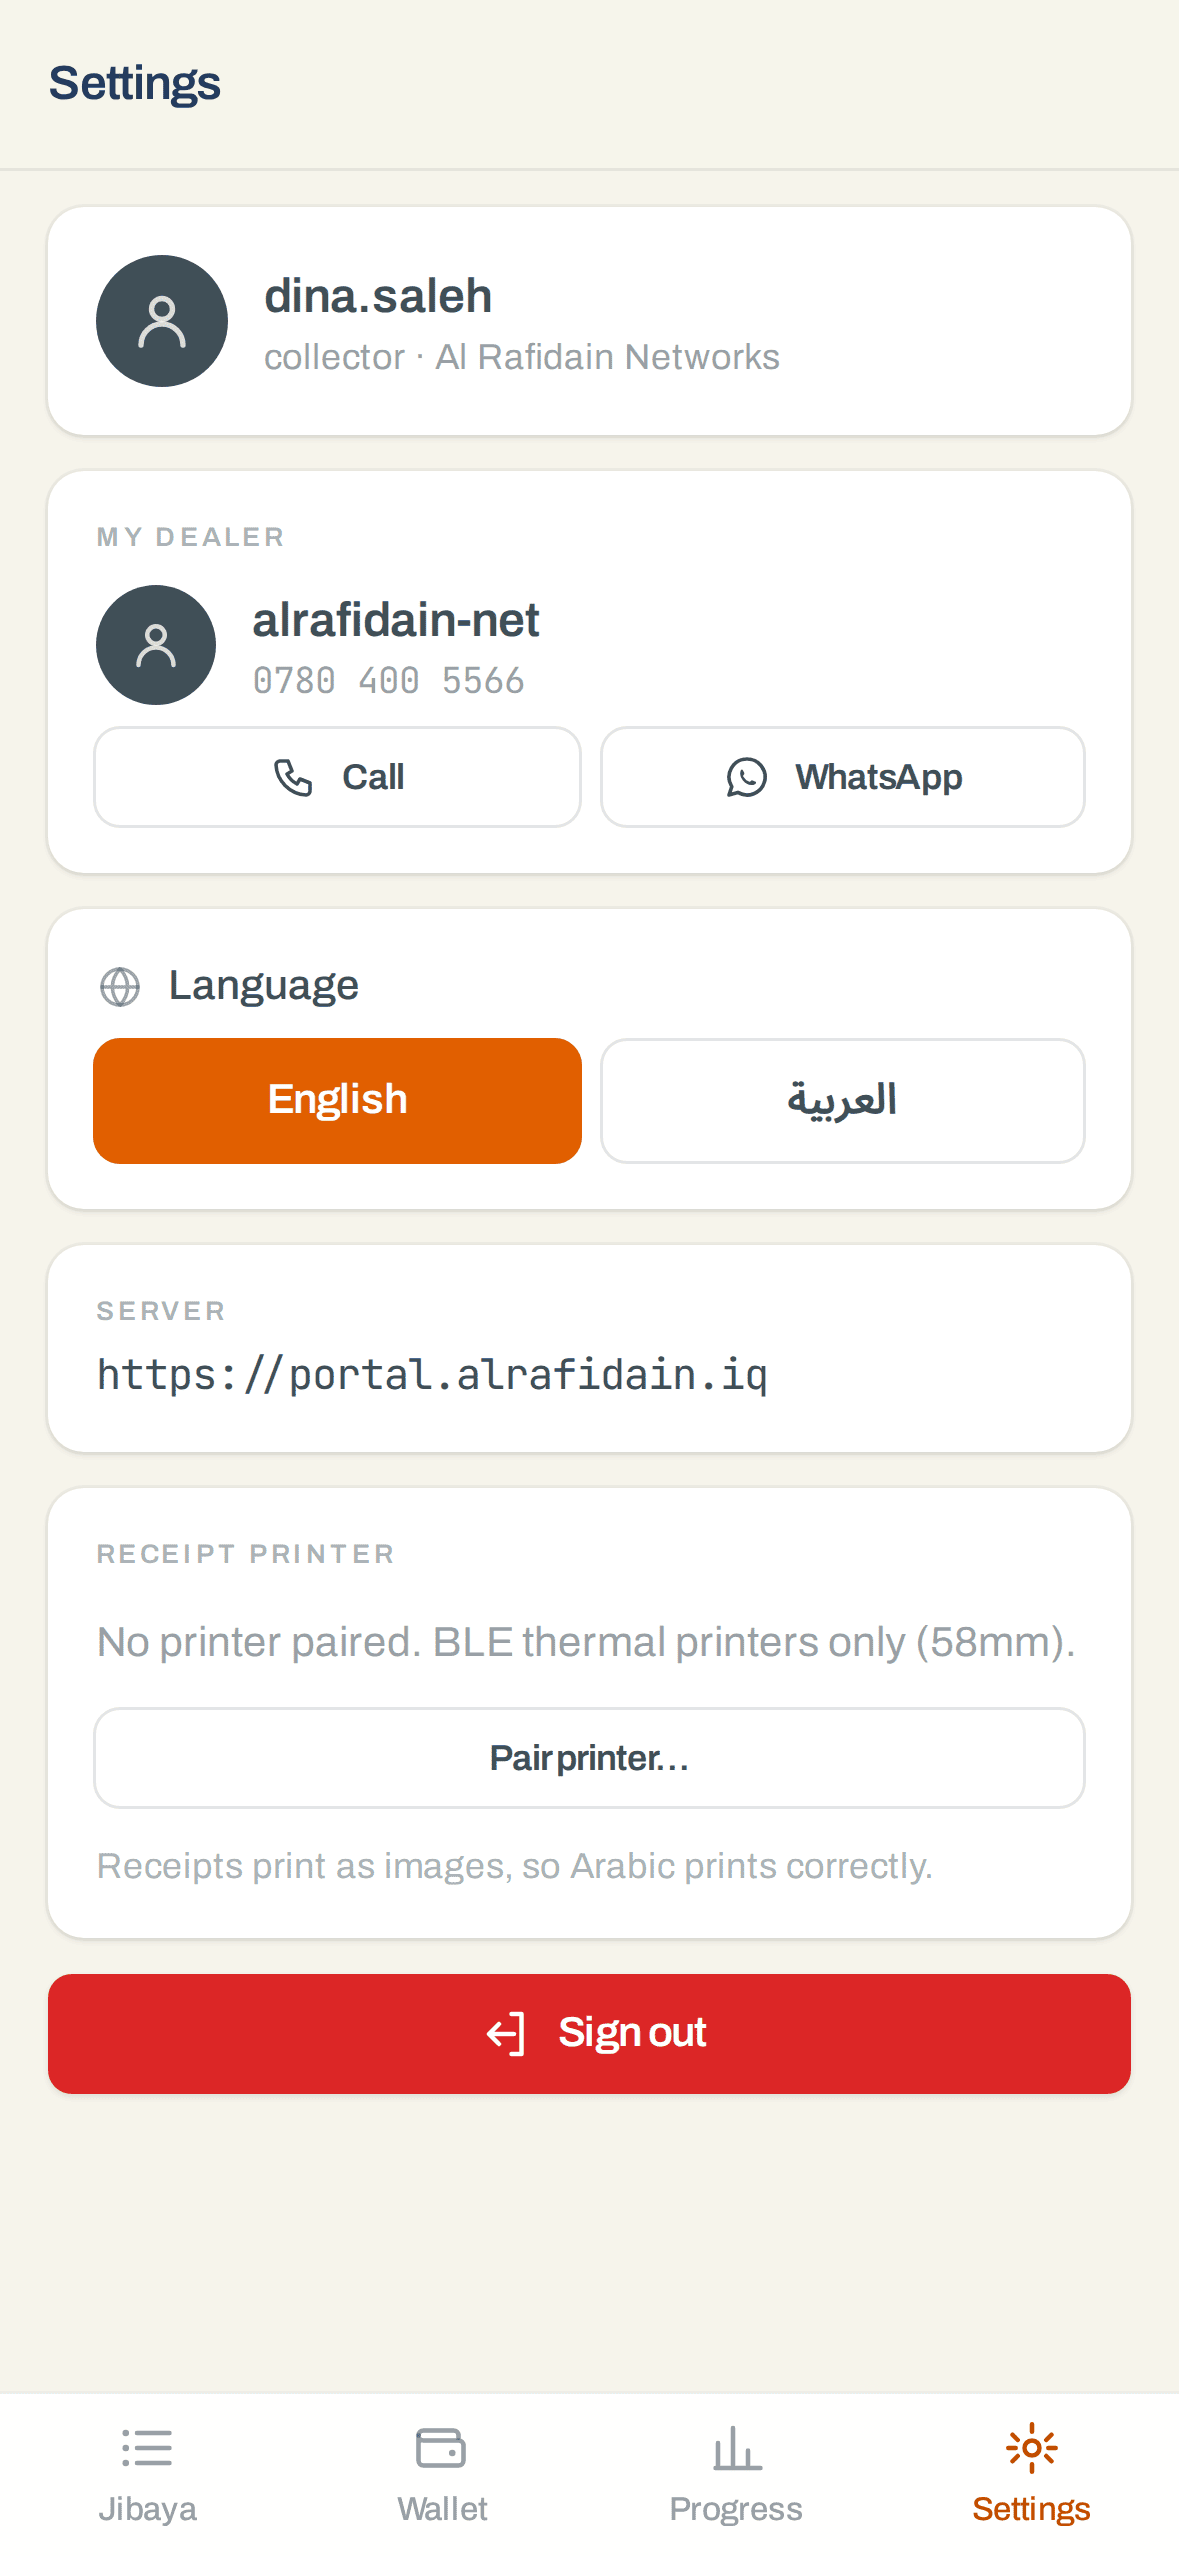
- Print from the receipt sheet if a 58 mm Bluetooth thermal printer is paired under Settings → Receipt printer. Receipts print as images, so Arabic comes out correctly on printers with no Arabic font.
- Language — each collector picks English or Arabic on the sign-in screen or in Settings, and it stays on their phone. A team where half the round is worked in Arabic and the other half in English is the normal case, not a workaround.
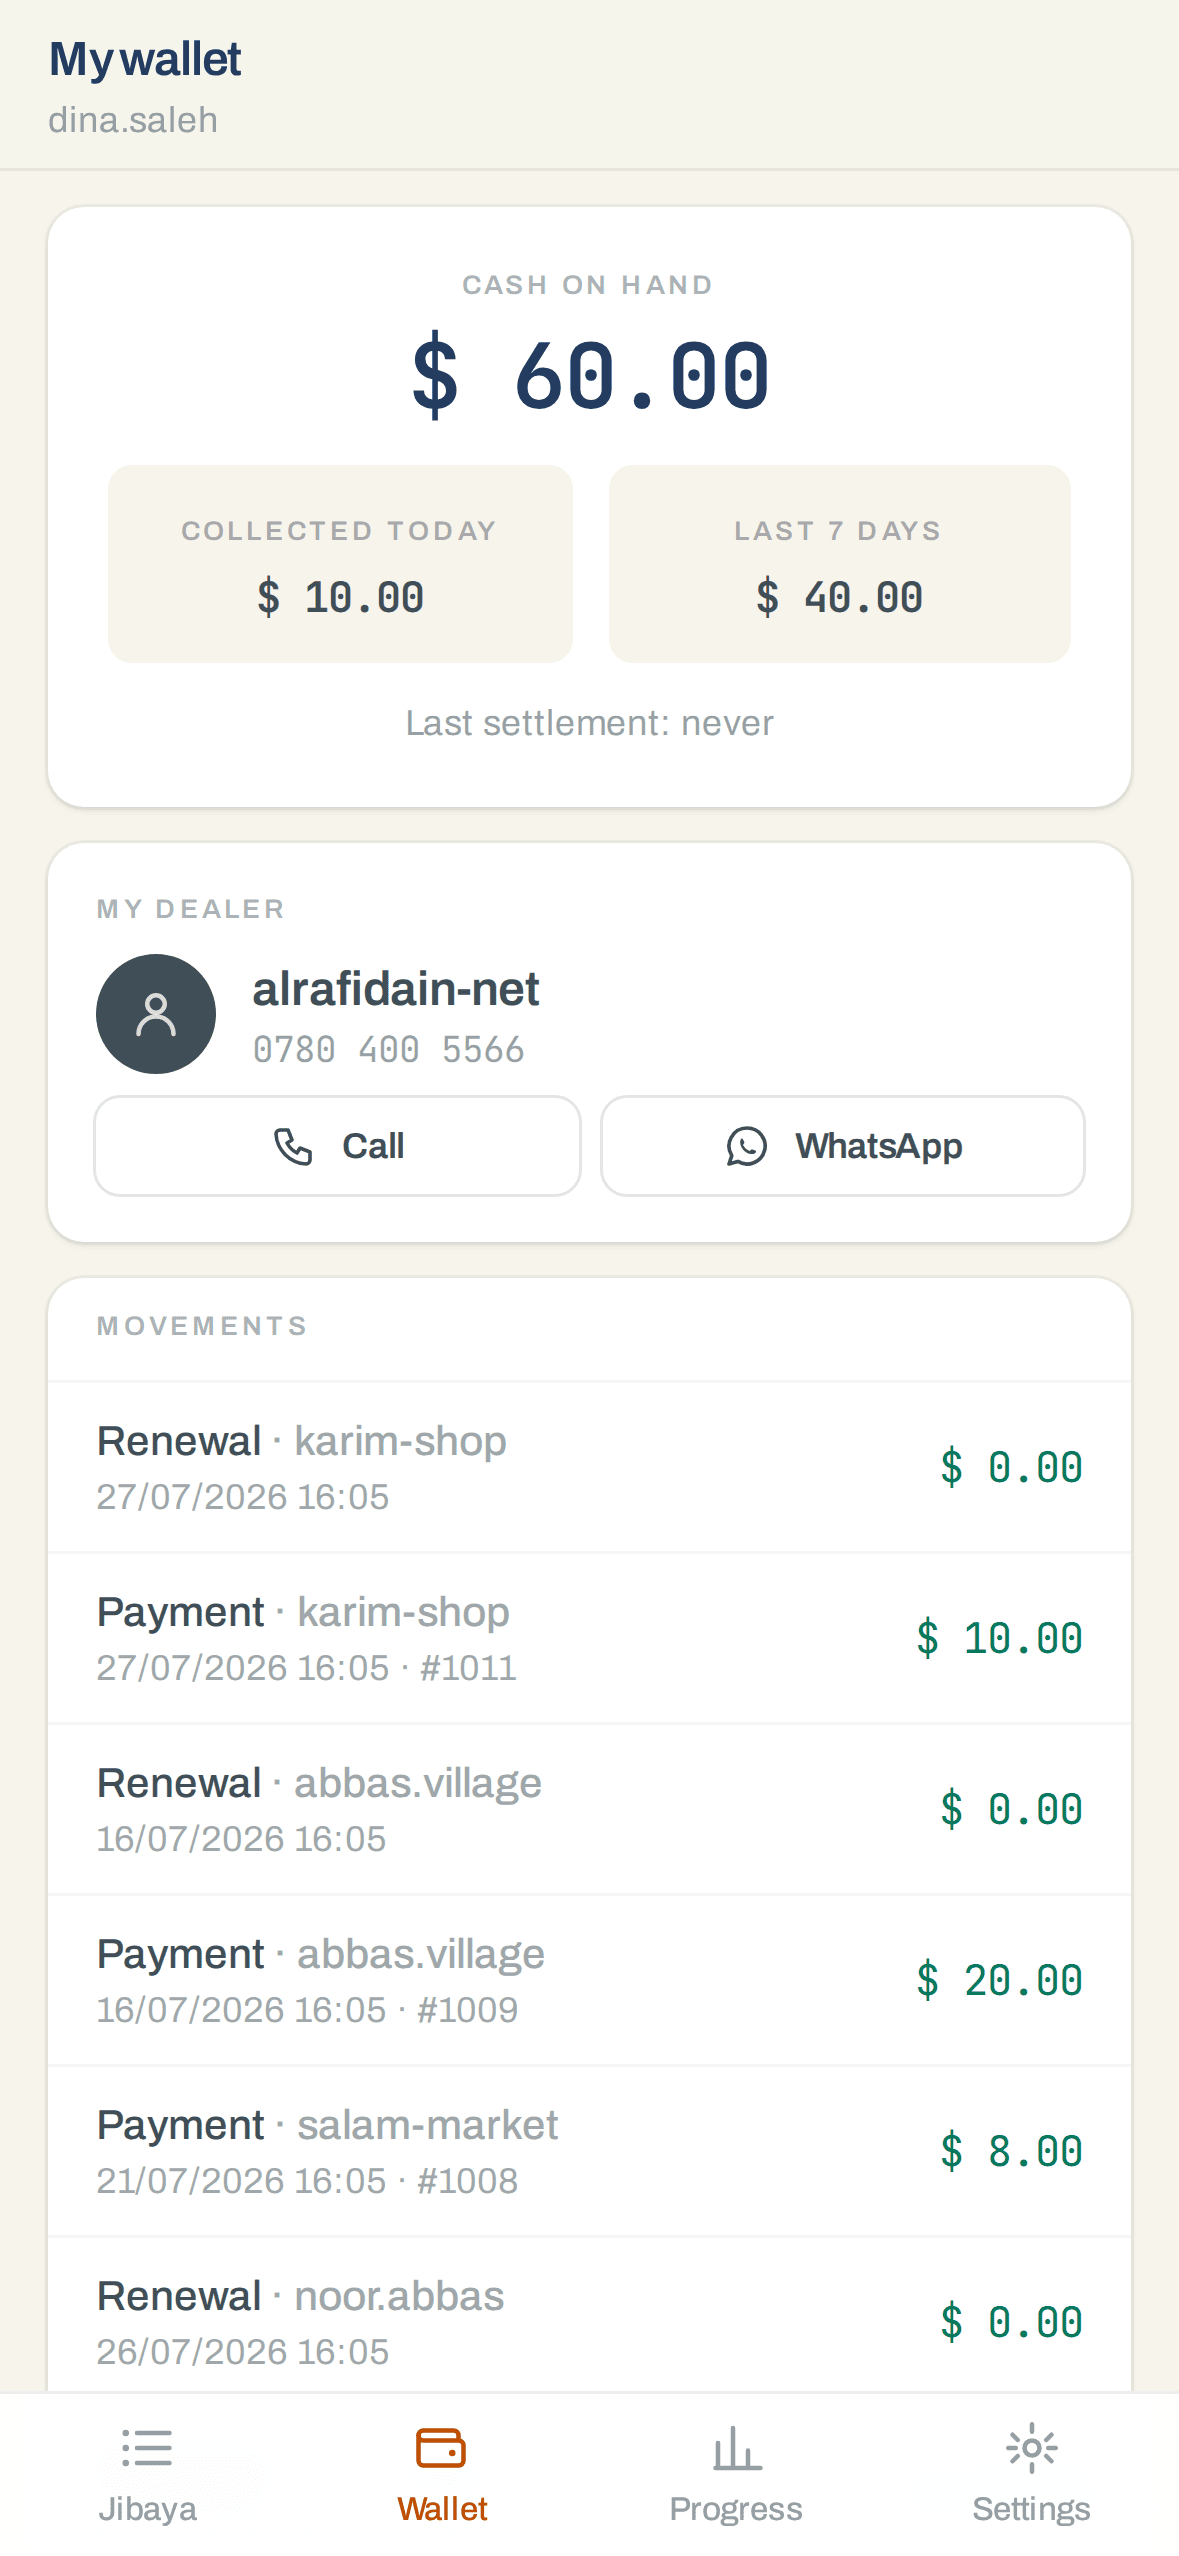
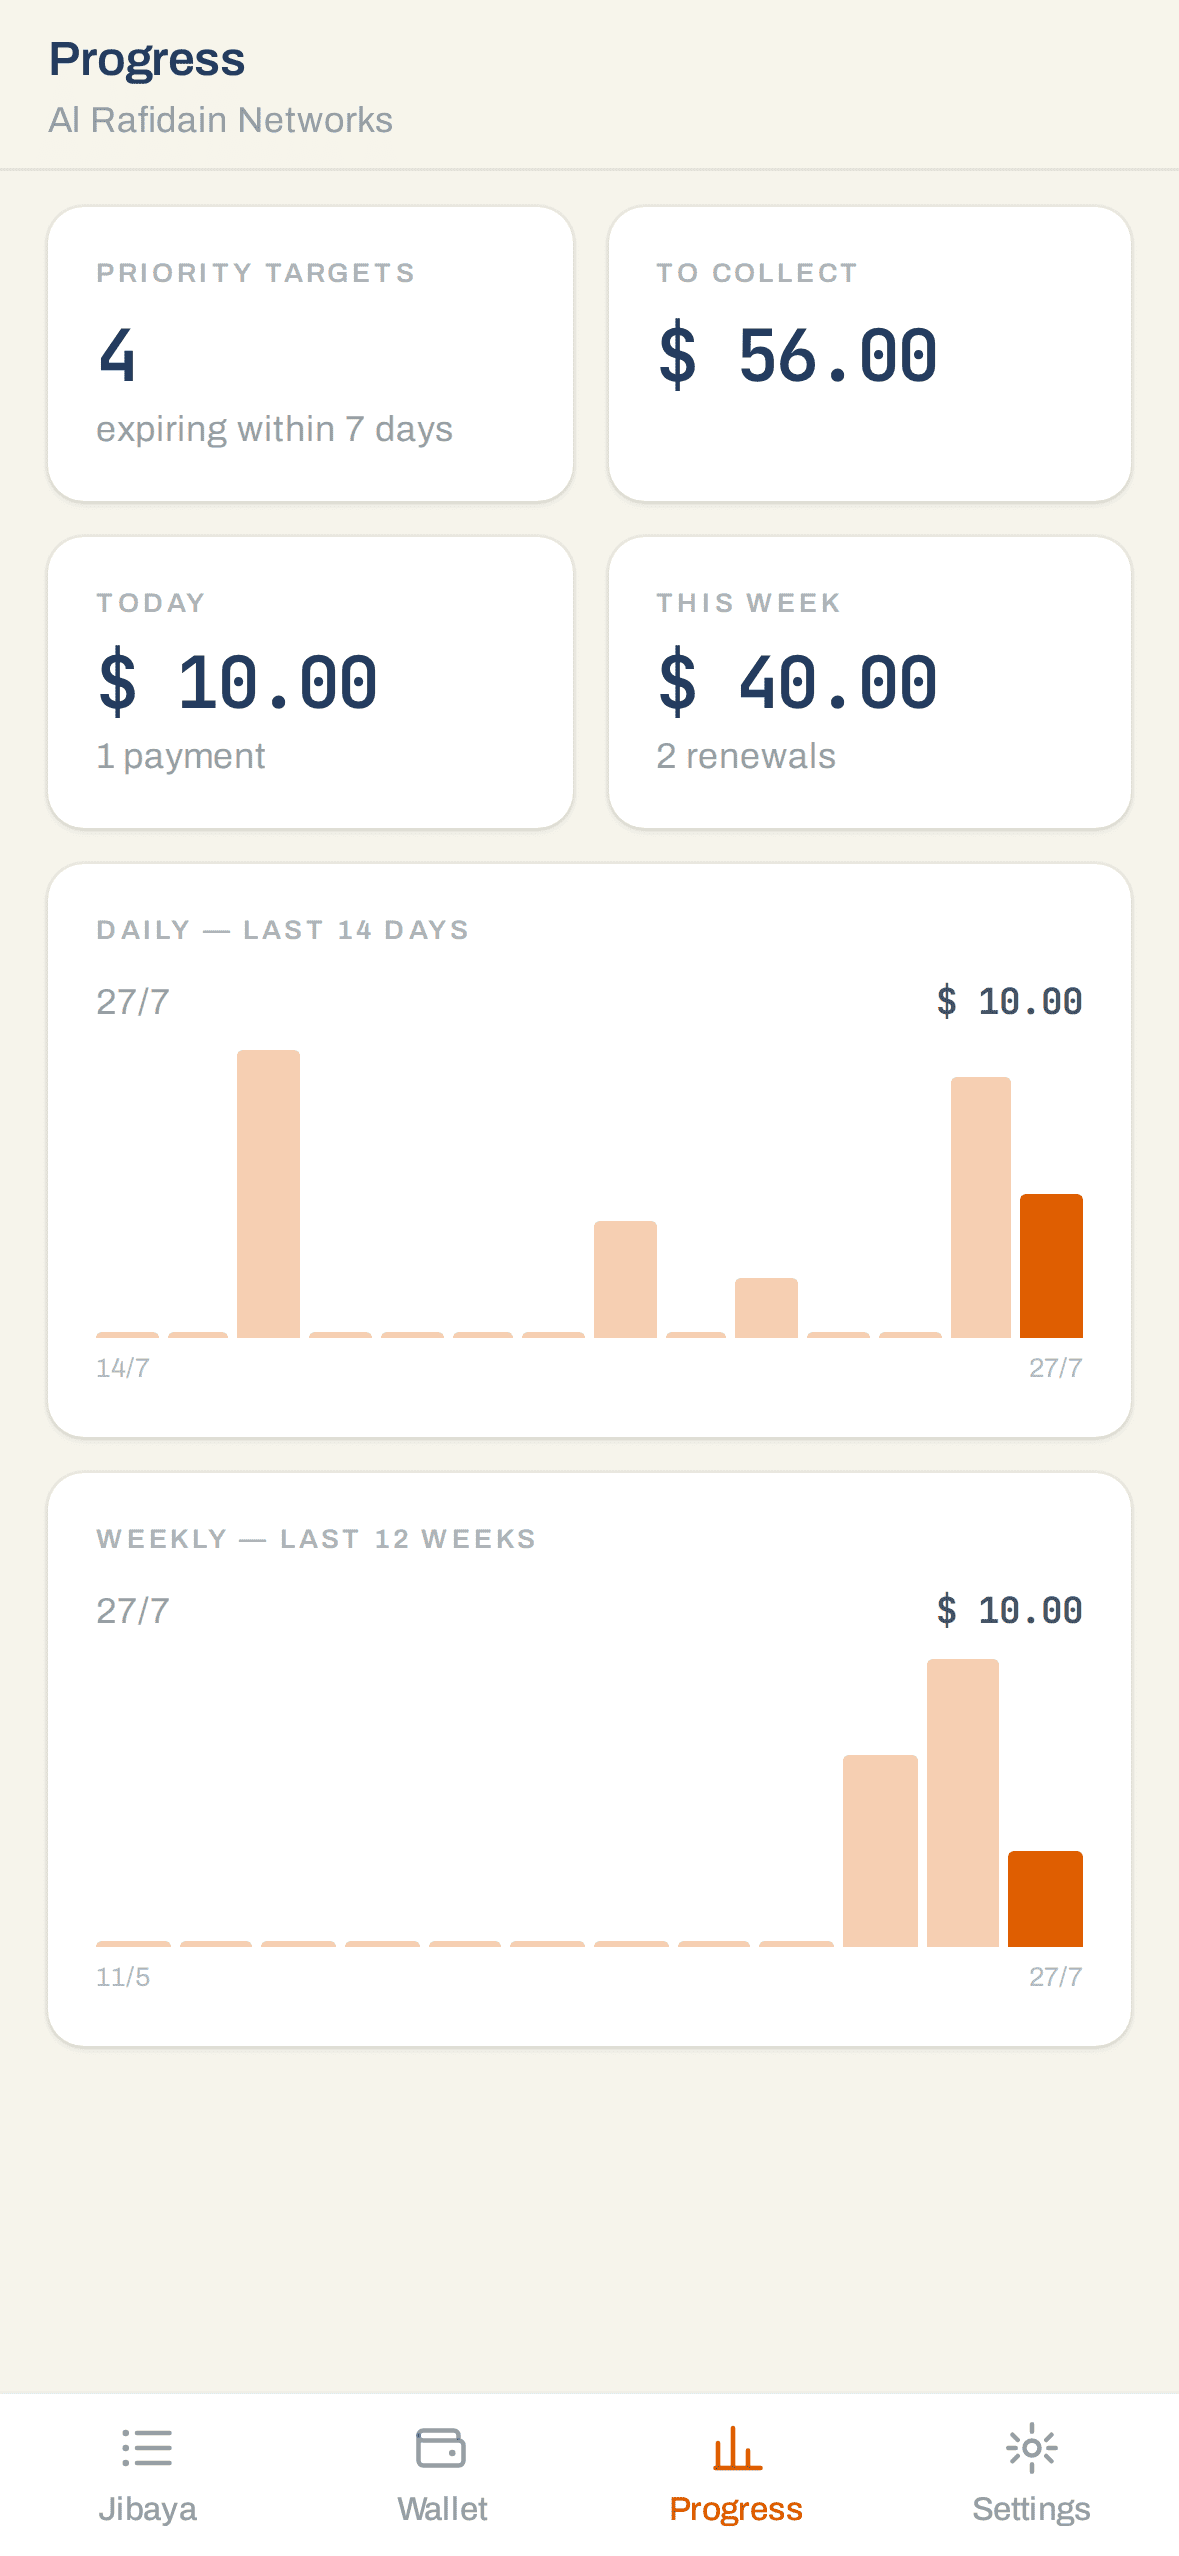
- The Wallet tab answers "how much am I carrying?" — cash on hand, today's and the week's totals, and every movement since the last settlement. The Progress tab shows how much of the round is left.
Take the cash in at the end of the day
Each collector's wallet holds what they've taken and not yet handed over. Settle it from the console (Jibaya → Collect cash on their card) or from the dealer's own phone (Team tab). Settle part or all of it; the amount and your note land in the ledger with a timestamp.
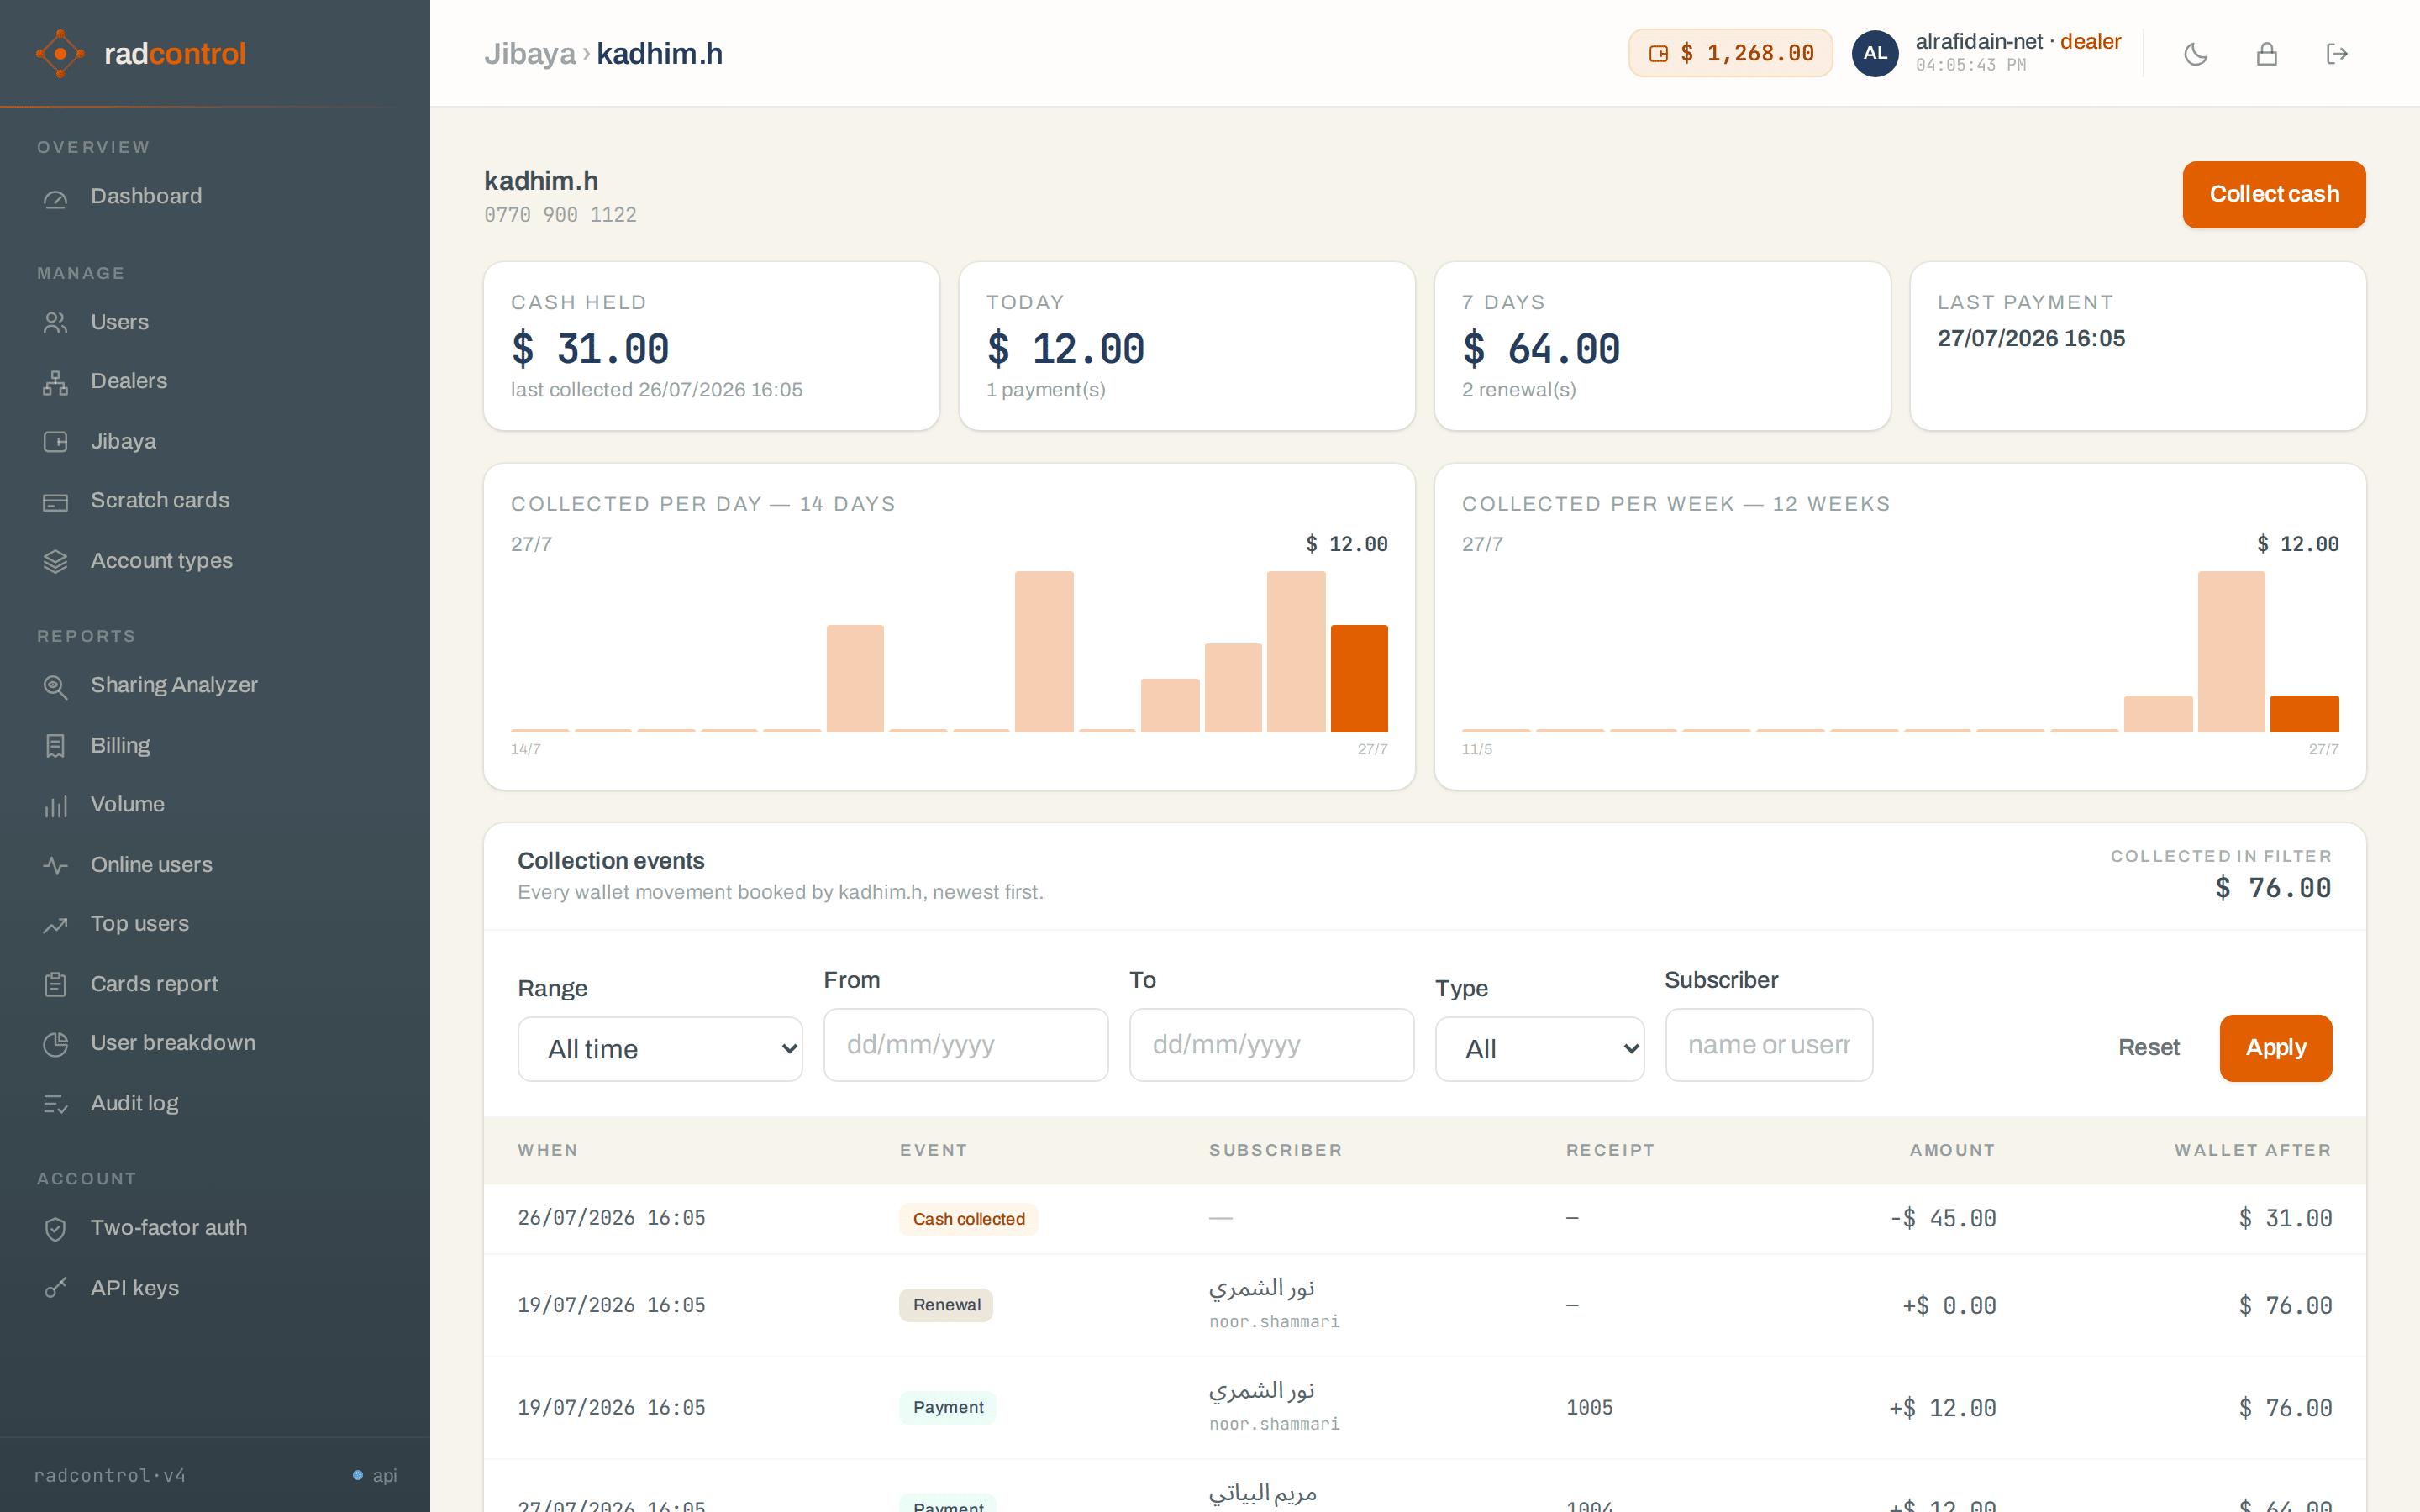
- The collector page shows cash held, today's and the week's totals, 14-day and 12-week charts, and every wallet movement — filter by date range, type or subscriber.
- The Jibaya page's four KPIs answer the daily question: how many doors are urgent, how much money that is, who has part-paid, and how much cash is sitting on balances.
- Dealers collect on their own round too — their own card appears alongside the team's.
9 · Backups & recovery
Do this on day one. System → Backup & recovery: pick SFTP or an S3-compatible bucket, paste credentials, and generate the recovery passphrase. Write the passphrase down somewhere that isn't this server. Snapshots are encrypted on your box before upload — without the passphrase, backups are noise.
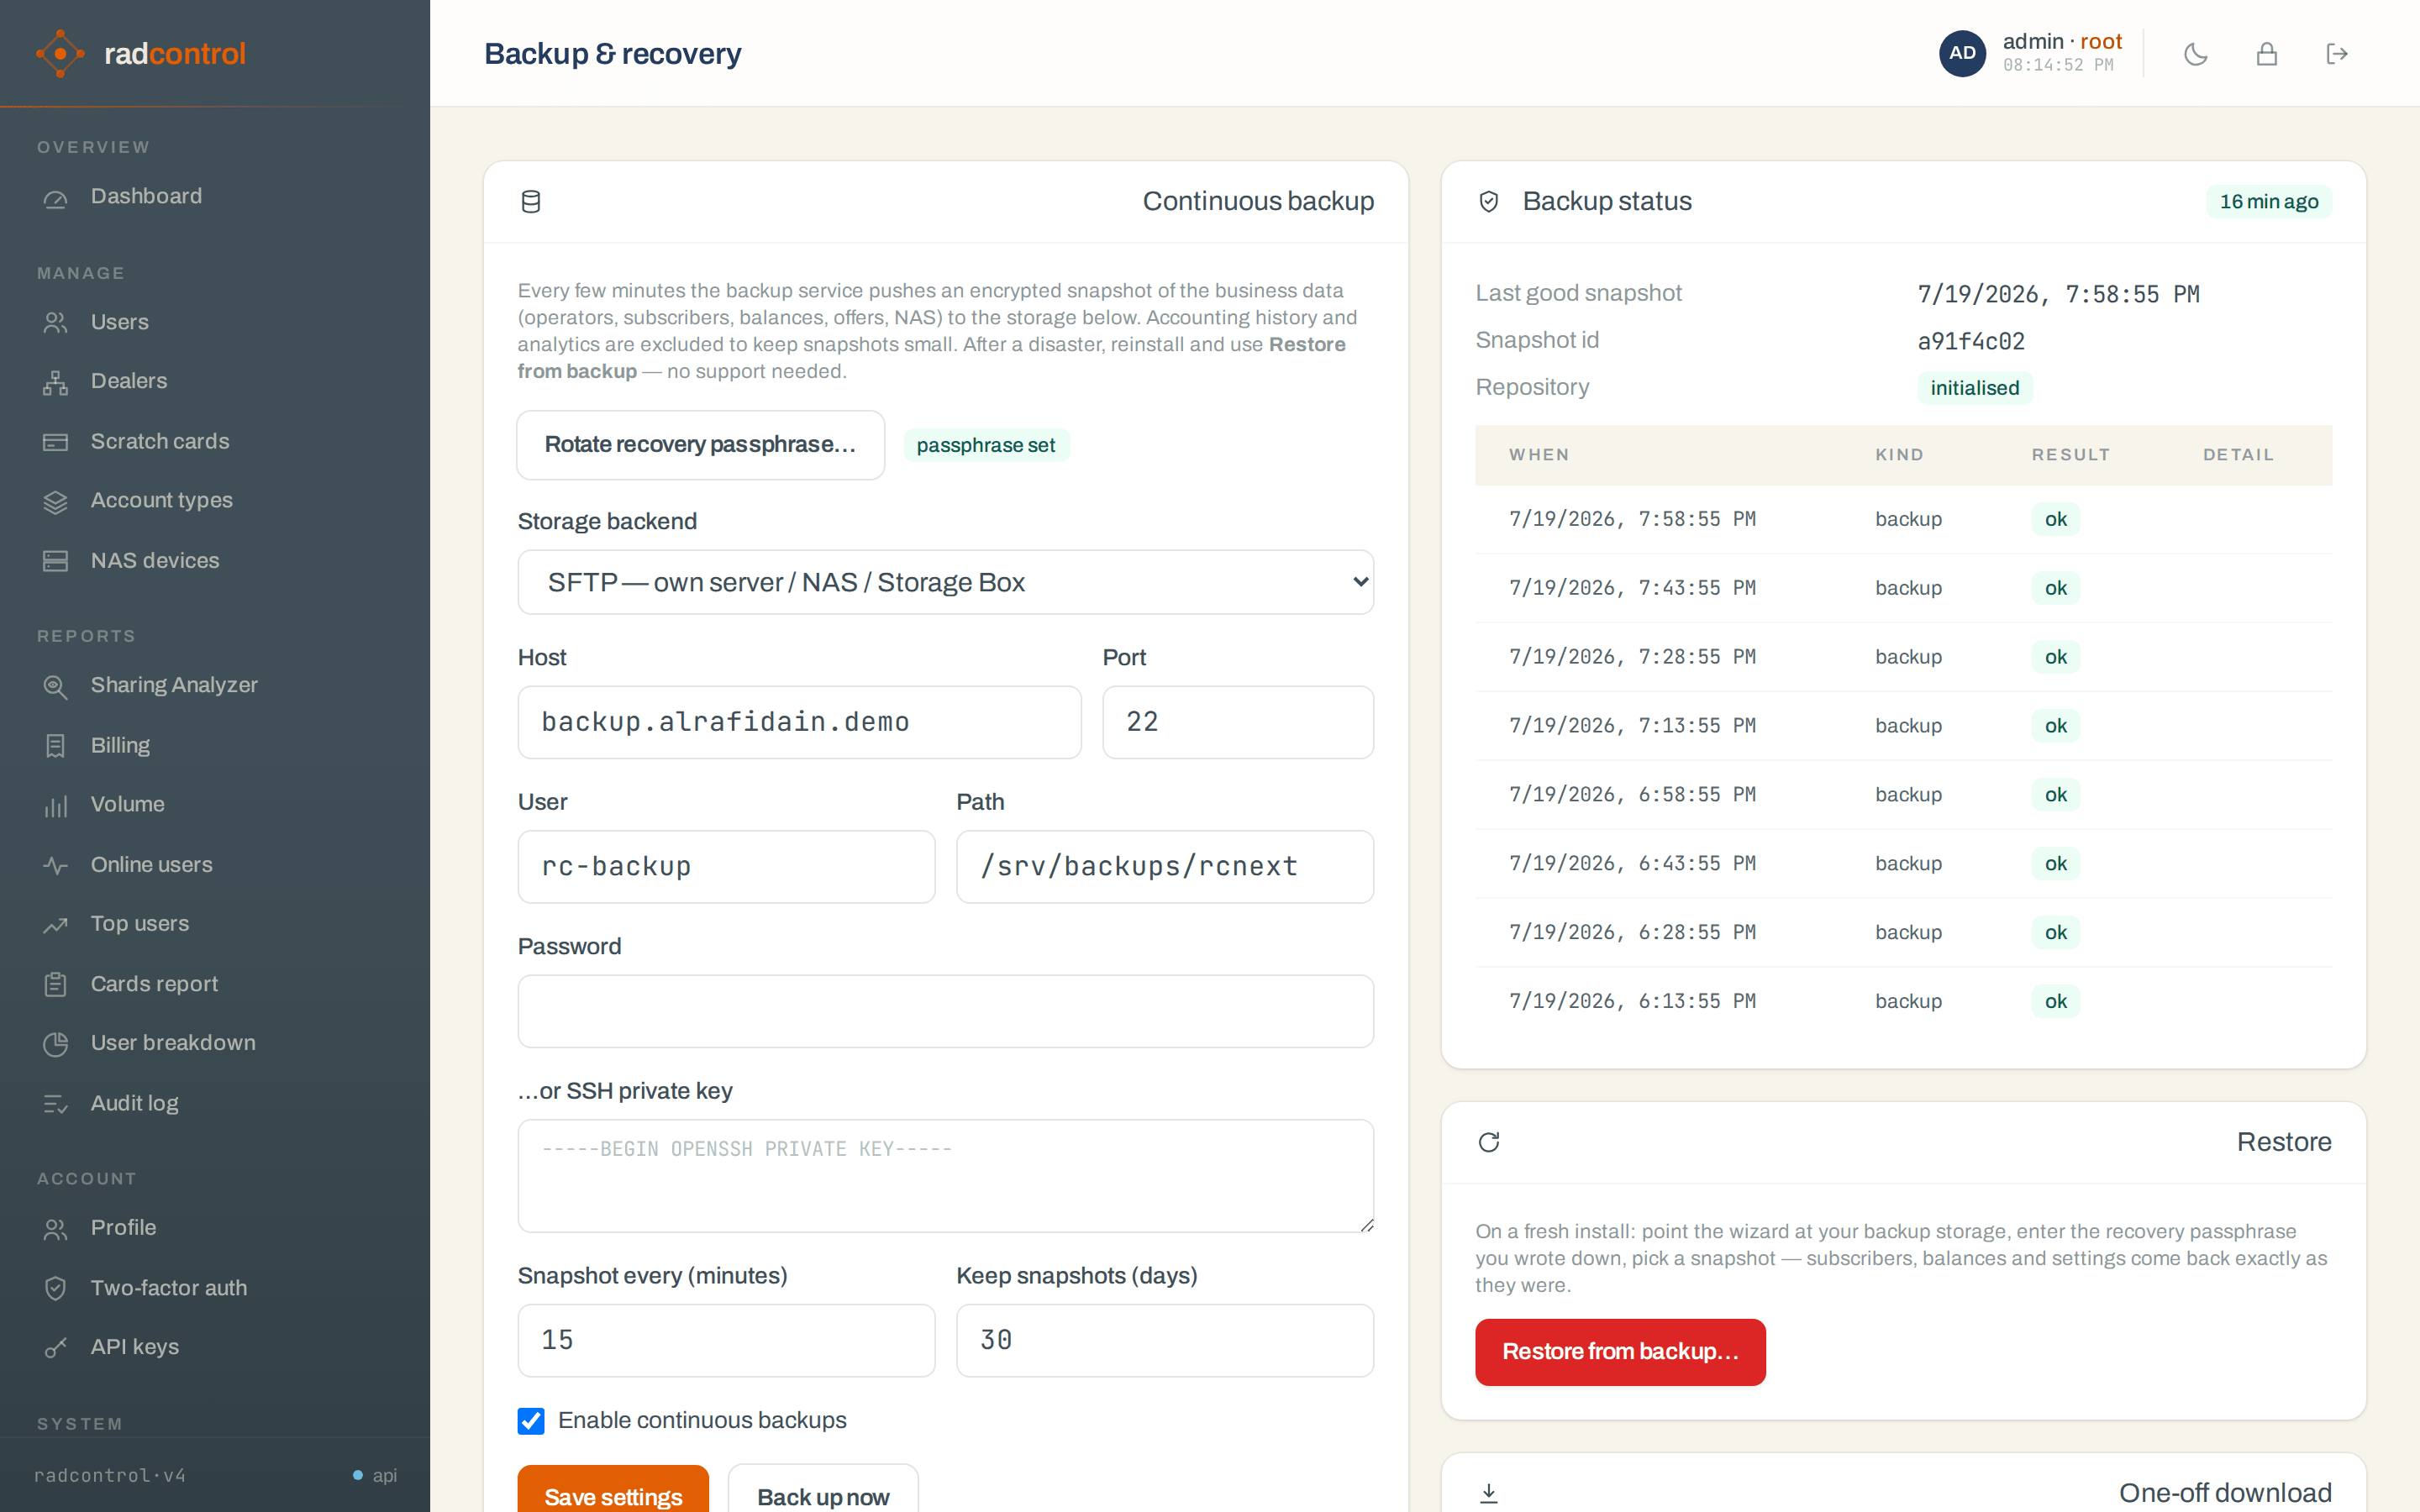
- Business data ships every 15 minutes; the dashboard card says protected with the last snapshot age.
- Disaster? Install radcontrol on a fresh box (same one-liner), open Backup & recovery, choose Restore from backup…, enter storage + passphrase, type
RESTORE. Subscribers, balances and settings return; routers reconnect on their own.
10 · Licensing
System → License shows the installed license: customer, expiry, subscriber limits, and validity. Licenses are signed files verified locally — no internet connection is ever required.
- Paste the license blob you received and save; the page shows the decoded limits immediately.
- Approaching a limit shows a warning well in advance. Passing it never cuts off existing subscribers — radcontrol only pauses new activations until you upgrade.
- Expired licenses get a 30-day grace period with a banner before enforcement starts.
11 · HTTPS & your domain
By default radcontrol serves the web UI over plain HTTP on port 80 — fine for a box you only reach over a private/VPN network. To open it to staff over the internet, give it a domain name and radcontrol will front the stack with Caddy, which gets and auto-renews a free Let's Encrypt certificate for you — no cron job, no manual renewals.
Before you start: point the domain's DNS A (and
AAAA, if you use IPv6) record at this server's public IP, and make sure
TCP 80 and 443 are open to the internet. Let's Encrypt proves you own
the name over port 80, so it must be reachable.
Turn it on at install time — just add the domain to the one-liner:
# Free, auto-renewing Let's Encrypt certificate:
$ curl -fsSL https://radcontrol.org/install.sh | sudo \
      RC_DOMAIN=portal.myisp.net RC_TLS_EMAIL=ops@myisp.net bash

# ...or bring your own certificate instead:
$ curl -fsSL https://radcontrol.org/install.sh | sudo \
      RC_DOMAIN=portal.myisp.net \
      RC_TLS_CERT=/etc/ssl/portal.pem RC_TLS_KEY=/etc/ssl/portal.key bash
When it finishes, the web UI is at https://portal.myisp.net/. The very first
visit can take a few seconds while the certificate is issued.
Change the domain, swap a certificate, or turn HTTPS off later — use the
tls.sh helper on the server (no reinstall, no downtime for RADIUS):
$ sudo /opt/rcnext/deploy/tls.sh letsencrypt new.myisp.net ops@myisp.net
$ sudo /opt/rcnext/deploy/tls.sh custom new.myisp.net /etc/ssl/x.pem /etc/ssl/x.key
$ sudo /opt/rcnext/deploy/tls.sh off        # back to plain HTTP :80
$ sudo /opt/rcnext/deploy/tls.sh status
- Let's Encrypt renews on its own — you never touch it again. Certificates persist across upgrades and restarts, so switching domains keeps prior certs cached.
- Your own certificate doesn't auto-renew: when you replace the
.pem/.keyfiles on disk, re-run the samecustomcommand to reload them. - Behind your own load balancer / reverse proxy? Leave HTTPS
off and terminate TLS there; radcontrol keeps serving HTTP on the port you
set with
PUBLIC_HTTP_PORT. - Upgrades (re-running the installer) never change your HTTPS settings — only
tls.shdoes.